


7
2
B
96
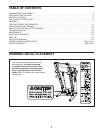
• To watch an assembly
video, go to
http://productvideo.co/
assembly/dsg/epic or
use your mobile phone
or smartphone to read
the QR code at the right.
• Assembly requires two persons.
• Place all parts in a cleared area and remove the
packing materials, except for the packing materi-
als on the upright. Do not dispose of the packing
materials until you nish all assembly steps.
• After shipping, there may be an oily substance
on the exterior of the treadmill. This is normal. If
there is an oily substance on the treadmill, wipe
it off with a soft cloth and a mild, non-abrasive
cleaner.
• Left parts are marked “L” or “Left” and right parts
are marked “R” or “Right.”
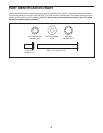
• To identify small parts, see page 6.
• Assembly requires the following tools:
the included hex keys
two adjustable wrenches
To avoid damaging parts, do not use power tools.
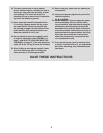
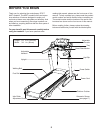
ASSEMBLY
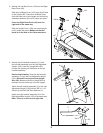
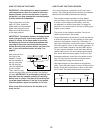
1. Make sure that the power cord is unplugged.
Also, make sure to assemble the treadmill in
the location where it will be used. If there is a
strap around the treadmill, remove it.
With the help of a second person, hold both
sides of the Upright (96) securely and remove
the packing materials (A) at the same time.
Then, carefully raise the Upright (96) into the
vertical position so that the base of the Upright
rests flat on the floor. Be careful not to pinch
the power cord.
1
96
A
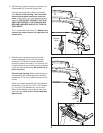
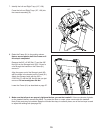
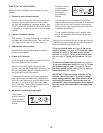
2. Identify the left leg extension assembly (B).
Insert the extension assembly into the left side of
the Upright (96). Attach the extension assembly
with two 5/16" x 3/4" Screws (1). Firmly tighten
the Screws.
Attach the right leg extension assembly (not
shown) to the right side of the Upright (96) in
the same way.
1
A
Base