


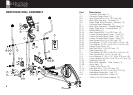
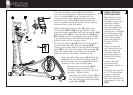

Part Description
A .......Console [Quantity: 1]
A-1 .....Console Hinge Cover [1]
A-2 .....Hex Screw M5 x 0.8 x 10.0 mm [8]
A-5 .....Main Wire Harness - Console [1]
A-6 .....Heart Rate Wire Harness - Console [1]
B .......Console Mast Assembly [1]
B-3 .....Main Wire Harness - Console Mast [1]
B-11 ....Heart Rate Wire - Console Mast [1]
B-13 ....Water Bottle [1]
B-14 ....Hex Screw M8 x 1.0 x 55.0 mm [4]
B-16 ....Lower Console Mast Cover - Front [1]
B-19 ....Lower Console Mast Cover - Left [1]
B-20 ....Lower Console Mast Cover - Right [1]
B-21 ....Hex Screw M5 x 0.8 x 20.0 mm [4]
B-25 ....Flat Washer 17.0 ID x 25.0 OD x 1t mm [2]
B-26 ....Flat Washer 8.0 ID x 16.0 OD x 2.0t mm [2]
B-27 ....Upper Pivot Cover [2]
B-33 ....Hex Bolt M8 x 1.25 x 20 mm [1]
C .......Rear Assembly [1]
C-1 .....Flat Washer 8.0 ID x 19.0 OD x 2.0t mm [4]
C-2 .....Hex Screw M8 x 1.25 x 16 mm [8]
C-3 .....Lock Washer 8.1 ID x 12.1 OD x 2.4t mm [8]
C-4 .....Curve Washer 8.0 ID x 19.0 OD x 2.0t mm [4]
C-23 ....Stabilizer Foot [4]
C-24 ....Main Wire Harness - Rear Frame [1]
C-28 ....Input Jack [1]
G-1 .....Lower Pivot Cover [2]
G-14 ....Hex Bolt M8 x 1.25 x 20 mm [2]
G-15 ....Flat Washer 8.0 ID x 16.0 OD x 2.0t [2]
H-L .....Handlebar Assembly - Left [1]
H-R .....Handlebar Assembly - Right [1]
N .......120V to 9V 2A Power Adaptor [1]
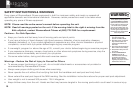
Assembly Notes
• Please read the entire Response Er6c Owner’s
Manual before beginning the assembly. Review
the package contents to ensure all listed parts are
included.
• The assembler will require 14 mm & 18 mm box
wrenches, 6 mm, 5 mm, 4 mm & 3 mm hex
wrenches, and a Phillips screwdriver for assembly.
All required tools are included.
• The estimated assembly time of the Response Er6c
by a person familiar with basic tool usage is forty-
five (45) to sixty (60) minutes.
• Always inspect the unit to ensure handlebars and
steparms are tightened prior to using the unit.
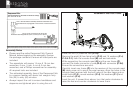
1
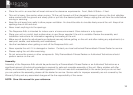
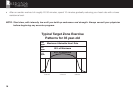
14mm / 19mm Box Wrench and Phillips Screwdriver Combination Tool
Outil combinant une clé polygonale 14 mm/19 mm et un tournevis cruciforme
(1)
3.0 mm, 4.0 mm, 5.0 mm & 6.0 mm Hex Key Set
Ensemble de clés hexagonales de 3,0 mm, 4,0 mm, 5,0 mm et 6,0 mm
(1)
Response Er6c
Assembly Hardware Kit / Ensemble du matériel de montage
DP # / DP nº #22-10-1254
Model: Er6c Assembly Hardware Kit Card
Year: DB Fitness 2011
Graphics Prepared by: Skip Reys; sreys@diamondbackfitness.com
Date Created:
12-Sep-10
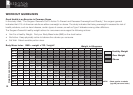
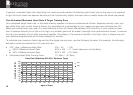
ASSEMBLY INSTRUCTIONS
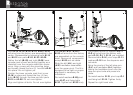
7
Install the four (4) stabilizer feet (C-23).
Remove the eight (8) hex fixing bolts (C-2) and 16 washers (C-4,
C-3 & C-1) from the console mast (B) and and set aside.
While supporting the console mast (B) and the rear frame (C),
connect the lower connector of wire (B-3) with connecter (C-24).
Ensure the connections are solid.
Carefully insert rear frame (C) into the receiver of the console mast
(B) taking care not to pinch the wire harness. Align the holes in the
console mast receiver with the bolt holes of the rear frame and re-
install bolts (C-2), curved washers (C-4), flat washers (C-1) and
lock washers (C-4).
Level the unit. If viewed from above, turn the knobs clockwise to
raise the feet and counter-clockwise to lower them.
C-3
C-1
C-4 C-2
B
C-24B-3
C-23
C