


USER’S GUIDE 2412
7
Power Supply
About the Pre-installed Battery
The battery installed at the factory discharges during shipment and inventory
storage. Because of this, it may not provide the normal battery life specified for
this watch.
• It is up to you to purchase a battery for replacement, even if the battery you
are replacing does not last for the specified battery life period.
Low Battery Indication
As the battery goes low, the watch gradually disables functions to conserve
remaining power, as described below.
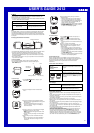
Step 1
The low battery indicator flashes on the display when
battery power drops below a certain level. At this
time, the following functions become disabled.
• Entry to the Camera Mode
• VISUAL DATABANK Mode text input and image
data deletion
• IR Mode data communication
Step 2
If you do not replace the battery within about 24 hours, the low battery
indicator stops flashing and remains on the display and the following function
also becomes disabled.
• Daily alarm and Hourly Time Signal sound
Note
• Attempting to access any of the disabled functions
listed in Step 1 and Step 2 above causes the
message LOW BATTERY to appear and let you
know that the function is not available due to low
battery power.
• The LOW BATTERY message remains on the
display for about one second.
Note that CASIO shall not be held responsible for any
damage or loss, including but not limited to lost profits, by
you or any third party due to data deletion or modification
due to malfunction, repairs, battery replacement, etc.
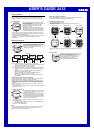
WAIT!!
LOW
BATTERY
SAT
6
-
3‰
P
1‰
:
58
35
l
l
l
l
l
l
l
l
l
l
l
Low battery indicator
Battery Precautions
Incorrectly using a battery can cause it to burst or leak, possibly damaging the
interior of the watch. Note the following precautions.
• This watch is powered by a single CR-2032 lithium battery.
• We strongly urge that you use only the type of battery specifically
recommended in this manual.
• Damage to or dirt, dust, moisture on the inside of the battery cover and the
battery compartment or on the surface that comes into contact with the
rubber seal (gasket) can cause loss of water resistance. Keep such areas
clean and free of moisture.
• Never leave a dead or weak battery in the battery compartment. Doing so
runs the risk of damage and malfunction due to battery fluid leaks.
• Be sure to dispose of old batteries according to the local laws and regulations
in your area.
• Improperly replacing the battery can result in damage to the watch. You will
be charged to repair such damage if it occurs, so take care to replace the
battery correctly.
• Never try to take the battery apart, or expose it to heat or direct flame. Take
care that the positive and negative ends of the battery never become shorted.
• The battery installed at the factory is not rechargeable. Never try to charge it.
• Should battery fluid ever leak inside the battery compartment, immediately use a
dry rag to wipe it out while taking care not to get any fluid on your hands.
Keep batteries out of the reach of small children. If accidentally
swallowed, immediately contact a physician.
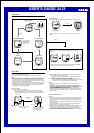
To replace the battery
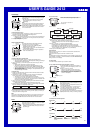
1.Open the battery cover.
• Insert a coin or other similar object into the slot in
the battery cover and rotate the cover to the
OPEN position.
• Do not use undue force when rotating the battery
cover. Doing so can damage the cover.
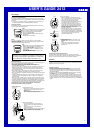
2.Remove the old battery.
• If you have trouble removing the battery, try
turning the back of the watch downwards so it
falls out.
• Take care that you do not lose the battery
compartment gasket.
• Keep your fingers away from the spring inside the
battery compartment. The sharp edges of the
spring create the risk of personal injury.
O
P
E
N
C
L
O
S
E
Gasket
O
P
E
N
C
L
O
S
E
Rotate to this
point to open.
Battery cover
O
P
E
N
C
L
O
S
E
Battery
compartment
Gasket
Spring
Inside of battery cover
Battery cover
Gasket
4.Close the battery cover.
• Replace the battery cover, and rotate it to the
CLOSE position using a coin or other similar
object.
• It takes about 10 seconds for something to
appear on the display after you close the
battery cover.
Settings Following Battery Replacement
The watch retains image data in memory when you replace the battery.
However, the current time, date, calendar, and alarm settings are all cleared.
Be sure you make these settings each time you replace the battery.
O
P
E
N
C
L
O
S
E
Rotate to this
point to close.
3.Load a new battery.
• Wipe the surfaces of a new battery with a dry
cloth, and load the battery into the watch with its
plus (+) side facing up (so you can see it).
• Never pick up the battery with tweezers
contacting the top surface and bottom surface at
the same time. Doing so creates a short.
• If the gasket comes out when you remove the
battery, be sure to replace it before loading the
battery. You will not be able to load the battery
properly if the gasket is not in place.
• Whenever replacing the gasket, make sure there
is not dust or dirt on it.
• Note the triangular shape of the gasket material.
The flat surface (the base of the triangle) is the
bottom, which should be against the watch body
when the gasket is installed. The pointed surface
(the peak of the triangle) is the top, which
contacts the battery cover.
Reference
This section contains more detailed and technical information about watch
operation. It also contains important precautions and notes about the various
features and functions of this watch.
Auto Return Features
• After you perform an operation in any mode except for the Camera Mode,
pressing D returns to the Timekeeping Mode.
• The watch automatically switches to the Timekeeping Mode if you do not
perform any operation for about one minute in any mode screen except for
the Stopwatch Mode.
• Pressing A while the VISUAL DATABANK Mode setting screen (including
the MENU screen) is on the display exits the setting screen.
• In any setting screen except for the IR Mode, the watch automatically exits
the setting screen if you do not perform any operation for about one minute.
• If you do not perform an operation for about five minutes after displaying the
IR Mode send/receive menu, the watch automatically returns to the IR Mode
screen.