


USER’S GUIDE 2412
2
▲
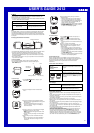
Timekeeping Mode
• Pressing C while in the Timekeeping Mode displays the Calendar screen.
Calendar
Timekeeping
Press C.
▲
▲
Press F.
▲
Timekeeping Mode
VISUAL DATABANK Mode
Stopwatch Mode
IR Mode Alarm Mode
Use this mode to view
images in watch
memory, to delete
images, to attach text
to images, etc.
Press D.
▲
PLAY
1‰
:
58
3
COM
1‰
:
58
INFRA RED
INFRA RED
AL1
1‰
:
58
A
12
:
‰‰
OFF
ST
W
1‰
:
58
‰
:
‰‰
‰‰‰
SAT
6
-
3‰
P
1‰
:
5835
2001 6
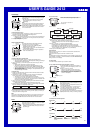
Lens
IR Port
General Guide
Press D to change from mode to mode.
▲
▲
▲
▲
SAT
6
-
3‰
P
1‰
:
58
35
• Press C again to return from the Calendar screen to the Timekeeping
Mode.
Camera Mode
• Pressing F in any mode besides the IR Mode enters the Camera
Mode.
• Pressing D while in the Camera Mode enters the VISUAL DATABANK
Mode so you can view images you have just recorded.
▲
SAT
6
-
3‰
P
1‰
:
58
35
REC
1‰
:
58
97
OUTDOOR
▲
Camera Mode
Use the Camera Mode to record images.
• The lens for image recording is located on the top edge of the watch.
Note
• Wrist Camera memory can store up to approximately 100 images. The actual
number of images you can store depends on recording conditions. If you
record many brightly lit or colorful images, for example, the total number of
images you can store may be less than 100, and remaining memory capacity
may be less than that indicated on the display.
• The above is also true for the remaining memory capacity value that appears
on the display. This value is an approximate number for reference purposes
only. Depending on recording conditions, you may be able to store fewer
images than that indicated on the display.
To record an image
1.Press F to enter the Camera Mode .
• Note that you cannot enter the Camera Mode from the IR Mode.
• The Camera Mode screen first shows remaining memory capacity for
about one second, followed by the image being picked up by the lens.
OUTDOOR
REC
1‰
:
58
97
2.While viewing the image on the display, point the lens of the watch at the
subject whose image you want to record.
• Pressing C at this time toggles between normal size and 2× digital
zoom.
3.Press F to release the shutter and record the image.
• This records the image currently on the display and saves it into
memory. The image and recording date and time remain on the display
for about three or four seconds as the image is being saved.
Note
• All watch button operations are disabled while the record operation is in
progress.
• The watch stays in the Camera Mode for about one minute after you
enter it. Then it automatically enters the VISUAL DATABANK Mode. See
“Camera Rest Interval” for more information.
• The message MEMORY FULL appears on the display to indicate that
memory is full. You will not be able to record an image while this message is
displayed. If this happens, delete images you no longer need to make room
for more images .
Camera Mode Precautions
General
• Never touch the surface of the lens. Fingerprints or dirt on the lens can cause
poor performance of the camera function. To clean the lens surface, use a
camera lens blower to blow off any dirt or dust particles, and then wipe with a
soft, dry cloth.
• Take care that you do not accidentally move the watch when you press F to
release the shutter.
• Insufficient lighting can result in poor images. Shoot in daylight whenever
possible. At night, shoot indoors in a well-lit area.
• Whenever you enter the Camera Mode, the watch normally performs a short
routine to adjust the CMOS sensor to match current lighting conditions.
Because of this, an image recorded right after you enter the Camera Mode
may contain unwanted specks. Always check the image on the watch display
and make sure its brightness is stable before recording it.
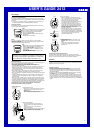
Remaining memory
capacity graph
Lighting type
Remaining memory capacity
(number of images)
▲
After about
one second
Current Time
Progress bar indicating time
remaining before watch exits the
Camera Mode (Changes from
blue to red as time elapses.)