


USER’S GUIDE 2412
3
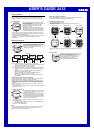
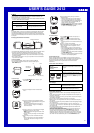
Remaining rest interval time
WAIT
13
CHECKING
VOLTAGE
‰
Brightness value
Camera Rest Interval
Camera Mode operations consume considerable battery power. To protect
against premature rundown of the battery power, the watch automatically goes
into a rest interval, during which you will be unable to re-enter the Camera
Mode after you exit it. The length of the rest interval is equal to the amount of
time you spent in the Camera Mode before you exited it. This means that if you
exit the Camera Mode after being in it for 20 seconds, you will be unable to re-
enter the Camera Mode for about 20 seconds.
If you try to enter the Camera Mode during a rest
interval, the message WAIT appears on the display,
along with a countdown of the remaining rest interval
time.
• The maximum rest interval is 60 seconds. The
maximum rest interval may be as long as 70
seconds following recording of an image using the
camera timer .
Displayed Image Size and Memory Image Size
Though the size of images displayed by this watch is 78 × 72 dots (78 × 80
dots in the case of an image that includes the recording date and time), the
size of the image stored in memory is 176 × 144 dots. This means that after
you transfer images to your computer or another device, you can display them
with 176 × 144 dots.
Alarm, and Hourly Time Signal Sounds
The watch does not emit any alarm, or Hourly Time Signal sound while it is in
the Camera Mode.
Controlling the Camera Mode Image
You can use the following procedures to adjust the brightness, to specify the
type of lighting present when recording an image, and to configure the camera
timer.
Adjusting Image Brightness
The watch automatically sets the brightness of the image when you record it.
You can also change the brightness level manually when you want to
compensate for backlighting of the subject, very dark backgrounds, etc.
To adjust image brightness
1.Before recording an image in the Camera Mode,
press A twice to enter the brightness setting
screen.
2.Use E (brighter) and B (darker) to adjust the
brightness of the image. A larger brightness value
indicates a brighter setting, while a smaller value
indicates a darker setting.
• You can set brightness to one of 15 levels in the
range of –7 to +7. The initial default level is ±0.
• It may take some time after you press B or E
before the change in brightness is reflected on
the displayed image.
• A brightness setting you make remains in effect
until you change it or exit the Camera Mode.
Automatic brightness adjustment is the initial
default whenever you enter the Camera Mode or
change the lighting type setting.
Important!
Even with manual brightness adjustment, you may not be able to obtain an
acceptable image when recording images under very bright or very dark
lighting conditions.
Specifying the Lighting Type
The type of lighting present when recording, greatly affects the resulting image.
You can use the procedure below to set up the watch for shooting indoors or
outdoors, which helps to ensure proper brightness for recorded images.
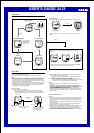
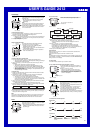
To specify the lighting type
Before recording the image in the Camera Mode, press E or B.
Use E or B to cycle through available lighting type settings in the sequence
shown below.
• You can select OUTDOOR for outdoor lighting, INDOOR for indoor lighting, or
DUSK for shooting at twilight or under other conditions where lighting is dim.
• The lighting type setting you make remains in effect until you change it or exit
the Camera Mode. OUTDOOR is the initial default whenever you enter the
Camera Mode.
• The screen refresh rate is relatively slow when DUSK is selected, which can
make changes in the image on the display appear slow.
OUTDOOR
OUTDOOR INDOOR DUSK
▲
Lighting
type
IN
DOOR
DUSK
▲
▲
▲
Press E.
Press B.
Using the Camera Timer to Record Images
You can select two seconds, five seconds, or 10 seconds as the camera timer
start time.
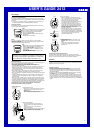
To record an image using the camera timer
1.In the Camera Mode, press A to display the
camera timer screen.
2.Use E and B to change the camera timer setting
in the sequence shown below.
• The default setting is 2 seconds.
Press .
2
Seconds
B
Press .
5
Seconds
10
Seconds
E
TMR 4
Camera timer indicator
3.Press F to start the camera timer and perform a record operation when the
end of the countdown is reached.
• The number of seconds remaining is counted down on the display.
• Pressing F while a countdown is in progress records the image and
cancels the remainder of the countdown.
• To stop a camera timer countdown and reset the timer start time to its
initial value, press A, B, or E.
• Pressing D while a camera timer countdown operation is in progress
changes to the VISUAL DATABANK Mode.
• The watch automatically exits the Camera Mode after about one
minute. If one minute elapses while camera timer operation is in
progress, the timer operation continues until it is complete. The watch
automatically returns to the VISUAL DATABANK Mode after recording
the image.
Camera timer time
VISUAL DATABANK
TM
Besides viewing images, you can use the VISUAL DATABANK Mode to delete
images, to attach text to images, etc.
Important!
The alarm and Hourly Time Signal do not sound while the VISUAL DATABANK
Mode setting screen is on the display.
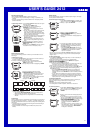
To view recorded images
1.In the Timekeeping Mode or the Camera Mode, press D to enter the
VISUAL DATABANK Mode .
• A screen showing the number of images in memory appears for about
one second, followed by a four-image thumbnail screen. The last image
you were viewing or the last image you recorded has a boundary
around it on the thumbnail screen.
PAGE
‰‰3
2. Use B and E to move the boundary between
images until the one you want is selected.
• Holding down either button moves the boundary
at high speed.
3. Press C to display the enlarged version of the
selected image with recording date and time.
• It can take from one to four seconds for the
enlarged version of the selected image to appear
clearly on the display.
• While the enlarged version of an image is on the
display, you can use B and E to scroll to
another image, if you want.
4.While the enlarged version of the selected image is
on the display, press C to display any text
assigned to the image (if there is any).
• Each press of C cycles through display settings
in the sequence shown below.
PLAY
1‰
:
58
4
Number of images in memory
After about
one second
Thumbnail screen
▲
Current Time
Image number
PAGE
‰‰4
Selected image
(with boundary)
Recording time
and date
Press .
Selected image
C
Image with text
Thumbnail screen
TARO
2‰‰1. 6.29.P 3:25
Text