


USER’S GUIDE 2412
4
Adjusting Image Contrast
Use the VISUAL DATABANK Mode to adjust image contrast.
• You can select an image contrast setting in the range of 1 (Darkest) to 15
(Lightest).
• The image contrast setting procedure is different from the display contrast
procedure described .
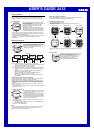
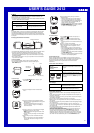
To adjust image contrast
1.In the VISUAL DATABANK Mode, hold down A for
about one second.
• This displays the MENU screen.
2.Use E and B to move the highlighting to
CONTRAST, and then press F.
• This displays the image along with a contrast
setting value.
• You can use the image screen to adjust contrast,
or you can use a special color chart screen,
which shows a number of different colored bars.
Press C to toggle the display between the image
screen and the color chart screen.
• The image that appears for the contrast setting is
the one you were last viewing in the VISUAL
DATABANK Mode.
• Only the color chart screen appears when you
perform the above step while image memory is
empty.
3.Use E (Lighter) and B (Darker) to adjust the
contrast of the image.
4.After you are finished, press F to return to the
MENU screen.
5.Pressing A exits the MENU screen and returns to
the screen that was on the display in step 1.
DELETE
NAME
CONTRAST
FORMAT
MENU
CNT
-
8
2‰‰1. 6.3‰.P1‰:58
CNT
-
8
CNT
-
9
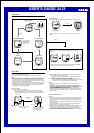
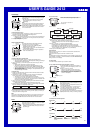
Attaching Text to an Image
You can use the following procedure to attach up to 24 characters of text to
each image.
To attach text to an image
1.In the VISUAL DATABANK Mode, use B and E to move the boundary to
the image to which you want to attach the text.
2.Press C to display the enlarged version of the selected image.
3.Hold down A for about one second until the
MENU screen appears.
4.Use E and B to move the highlighting to NAME.
5.Press F to display the text input screen.
6.Input the text you want.
• Use B and E to cycle through available
characters in the sequence shown below at the
current cursor location.• Holding down either
button scrolls at high speed.
• Press C to cycle input between alpha characters
(A), numbers ( ),and symbols (&).
• Use D to move the cursor.
DELETE
NAME
CONTRAST
FORMAT
MENU
2‰‰1. 6.3‰.P1‰:58
l
l
l
l
l
l
l
l
l
A to Z(space)
Press E. Press B.
•~ ?: .—,
0 to 9& ’ ( )
7.After you finish inputting the text you want, press A to return to the screen
in step 2 of this procedure.
• The message WAIT NOW SORTING remains on the display as the
watch saves the text, and then the image appears.
• Pressing C displays the the enlarged version of the selected image
with text.
Image Sorting
Images in watch memory are automatically sorted according to the first letter of
their attached text (alpha characters → numbers → symbols). Images that do
not have any attached text come last, sorted according to their recording dates
(oldest first).
• If multiple images have the same text, those images are sorted according to
their recording dates (oldest first).
• Images transferred to the watch using the IR Mode may not be sorted
correctly.
Deleting Images
You can use the following procedures to delete a specific image or all images
currently stored in watch memory.
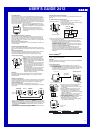
To delete all images in watch memory
1.In the VISUAL DATABANK Mode, hold down A for
about one second until the MENU screen appears.
2.Press E or B to select DELETE.
3.Press F to display the DELETE menu.
4.Press B or E to select ALL.
• Selecting CANCEL and pressing F returns to
the previous screen.
5.Press F and a confirmation message appears on
the display.
6.If you really want to delete the image, press B or
E to select YES and then press F. To clear the
confirmation message without deleting anything,
select NO and press F.
• The message WAIT DELETE ALL remains on
the display as the delete operation is in progress.
The MENU screen appears after the delete
operation is complete.
DELETE
NAME
CONTRAST
FORMAT
MENU
DELETE
PAGE
ALL
CANCEL
DELETE
ALL
NO
YES
• You can return to the normal VISUAL DATABANK Mode screen during the
above procedure by pressing A at any point before actually deleting the
image in step 7.
To delete a specific image
1.In the VISUAL DATABANK Mode, use B and E to move the boundary to
the image you want to delete.
2.Press C to display the enlarged version of the selected image.
3.Hold down A for about one second until the MENU screen appears.
4.Press E or B to select DELETE.
5.Press F to display the DELETE menu.
6.Press B or E to select PAGE and press F.
• The image that will be deleted appears on the display. At this time you
could use E and B to select a different image, if you want.
7.Press F again and a confirmation message appears on the display.
8.If you really want to delete the image, press B or E to select YES and then
press F. To clear the confirmation message without deleting anything,
select NO and press F.
• The message WAIT DELETE PAGE remains on the display as the
delete operation is in progress. The watch automatically clears the
message and returns to the DELETE menu after the delete operation is
complete.
• You can exit the image delete screen during the above procedure by
pressing A at any point before actually deleting the image in step 8.
• Depending on the size of the image you delete, the remaining memory
capacity value may not change after deletion is complete.
Formatting Image Memory
Perform the steps below to re-format Wrist Camera memory whenever you
experience image memory problems due to memory error, etc.
Important!
• Formatting image memory deletes all images there.
• If formatting does not solve the problem, format two or three times.
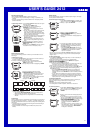
To format image memory
1.In the VISUAL DATABANK Mode, hold down A for
about one second until the MENU screen appears.
2.Use E and B to move the highlighting to
FORMAT.
3.Press F and a confirmation message appears on
the display.
4.If you really want to format image memory, press
B or E to select YES and then press F. To clear
the confirmation message without formatting image
memory, select NO and press F.
• The message WAIT FORMAT stays on the
display while formatting is in progress. After
formatting is complete, the MENU screen
appears.
• If you want to cancel the format procedure at any
time before step 4, press A. Note that formatting
cannot be canceled once the WAIT FORMAT
message is on the display.
FORMAT
NO
YES
DELETE
NAME
CONTRAST
FORMAT
MENU