


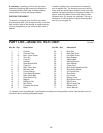


8
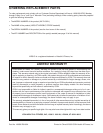
MAINTENANCE AND TROUBLESHOOTING
Most problems can be solved by following the simple steps below. If further assistance is needed, call
our Customer Service Department toll-free at 1-800-999-3756, Monday through Friday
, 6 a.m. until 6 p.m.
Mountain Time (excluding holidays).
1.
SYMPTOM: THE CONSOLE DOES NOT
FUNCTION PROPERLY
a. Replace the batteries in the console (see assem-
bly step 5 on page 5).
b. Make sure that the reed switch is properly adjust-
ed (see assembly step 4 on page 5).
c. Make sure that the reed switch wire is plugged
fully into the back of the console (see assembly
step 3 on page 4).
d. The console, like most electronics, is susceptible
to static electricity build-up caused by certain
types of clothing or by the operation of the tread-
mill. If the display is blank or gives incorrect read-
ings, apply an anti-static spray to the handrail.
Anti-static spray is available where laundry sup-
plies are sold.
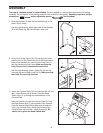
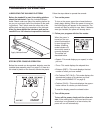
2. SYMPTOM: THE WALKING BELT DOES NOT
MOVE SMOOTHLY
a. If the walk-
ing belt is
overtight-
ened, per-
formance
may be
reduced and
the walking
belt may be
permanently
damaged. Using the allen wrench, turn both rear
roller adjustment bolts counterclockwise 1/4 of a
turn. When the tension of the walking belt is cor-
rect, you should be able to lift each side of the
walking belt 2 to 3 inches. Walk on the treadmill
for a few minutes.
Repeat until the walking belt is
properly tightened. Be careful to keep the walking
belt centered.
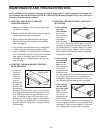
3.
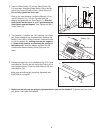
SYMPTOM: THE WALKING BELT SLIPS OR IS
OFF-CENTER
a. If the walking
belt slips
when walked
on, use the
allen wrench to
turn both
adjustment
bolts clockwise,
1/4 of a turn. When the walking belt is correctly
tightened, you should be able to lift each side of
the walking belt 2 to 3 inches. Walk on the tread-
mill for a few minutes. Repeat until the walking
belt is properly tightened. Be careful to keep the
walking belt centered.
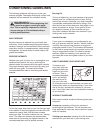
b.
If the walking
belt has shift-
ed to the left
side, use the
allen wrench to
turn the left
adjustment bolt
clockwise, and
the right adjustment bolt counterclockwise, 1/4 of
a turn each. Be careful not to overtighten the
walking belt. Walk on the treadmill for a few min-
utes. Repeat until the walking belt is centered.
c. If the walking
belt has shift-
ed to the right
side, use the
allen wrench to
turn the left
adjustment bolt
counterclock-
wise, and the right adjustment bolt clockwise, 1/4
of a turn each. Be careful not to overtighten the
walking belt. W
alk on the treadmill for a few
min-
utes. Repeat until the walking belt is centered.
2"–3"
Bolts
Walking Belt