


12
11
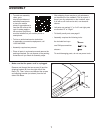
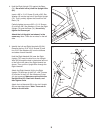
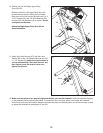
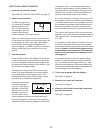
11. Attach the Latch Housing (67) with the Latch
Spacer (82) to the Left Upright (66) with two #10
x 1 1/2" Screws (8); make sure that the knob is
on the indicated side. Start both Screws, and
then tighten them. Be careful not to over-
tighten the Screws.
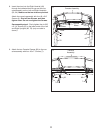
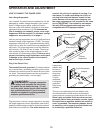
12. Make sure that all parts are properly tightened before you use the treadmill. If there are sheets of plastic
onthetreadmilldecals,removetheplastic.Toprotecttheoororcarpet,placeamatunderthetreadmill.
Note: Extra parts may be included. Keep the included hex keys in a secure place; one of the hex keys is used
to adjust the walking belt (see pages 21 and 22).
67
82
8
66
Knob
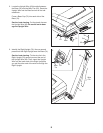
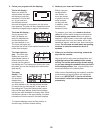
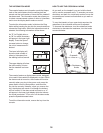
10. Identify the Left and Right Upper Body
Arms (84, 85).
Make sure that the Left Upper Body Arm (84)
is positioned as shown. Attach the Left Upper
Body Arm to the Left Upright (66) with two 1/4" x
3 1/2" Screws (56), two 1/4" Star Washers (23),
and two 3/8" Star Washers (3) as shown. Do not
overtighten the Screws.
Attach the Right Upper Body Arm (85) as
described above.
10
66
3
23
56
56
84
85
23
3