


9
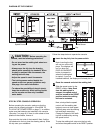
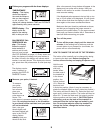
Follow your progress with the three displays.
TIME/DISTANCE
displayÑThis display
shows the elapsed
time and the distance
that you have walked
or run, in miles. The
display will change between TIME and DISTANCE
approximately every seven seconds.
SPEED displayÑThis
display shows the
speed of the walking
belt, in miles per hour.
CALORIES/FAT CAL-
ORIES/PULSE dis-
playÑThis display
shows the approxi-
mate numbers of
calories and fat calo-
ries you have burned.
(See FAT BURNING on page 14.) Every seven sec-
onds, the display will change from one number to
the other. Arrows in the display will indicate which
number is currently shown. This display also shows
your pulse when the pulse sensor is used (see step
4).
The displays can be
reset, if desired, by
pressing the DISPLAY
ON/RESET button.
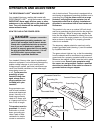
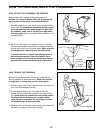
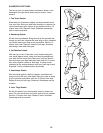
Measure your pulse, if desired.
To measure
your pulse,
stand on the
foot rails and
place your
thumb on the
pulse sensor as
shown. The
pulse sensor is pressure activatedÑfully press it
down. Do not press too hard, or the circulation
in your thumb will be restricted, and your pulse
will not be detected.
Next, raise your
thumb slightly until
the heart-shaped indi-
cator in the PULSE
display flashes
steadily. Hold your
thumb at this level.
After a few seconds, three dashes will appear in the
display and your pulse will be shown. Hold your
thumb on the sensor for another 15 seconds for the
most accurate reading.
If the displayed pulse appears to be too high or too
low, or if your pulse is not displayed, lift your thumb
off the sensor and allow the display to reset. Press
down again on the sensor as described above.
Make sure that your thumb is positioned as shown,
and that you are applying the proper amount of
pressure to the pulse sensor. Try the sensor several
times until you become familiar with it. Remember to
stand still while measuring your pulse.
Turn off the power.
To turn off the power, simply wait for about six
minutes. If the walking belt is stationary and the
console button is not pressed for six minutes, the
power will turn off automatically.
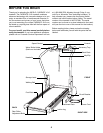
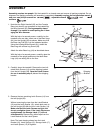
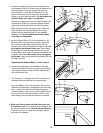
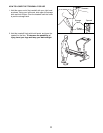
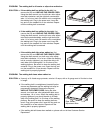
HOW TO CHANGE THE INCLINE OF THE TREADMILL
The incline of the treadmill can be changed by raising
or lowering the back end. Before changing the
incline, remove the key and unplug the power cord.
Hold the rear
roller endcap
with both
hands. When
the back end of
the treadmill is
in the lowest
position, the
incline is about
10%. Raise the
back end until
it clicks into position. (Note: It may be necessary to
shake the treadmill lightly so that it clicks into position.)
The incline will then be about 5%. Raise the back end
again until it clicks into position. The incline will then be
about 3%. To lower the back end, first raise it past the
highest position and then lower it. CAUTION: Before
exercising, push on the back of the treadmill to
make sure that the incline legs are locked in posi-
tion. Do not place objects under the treadmill to
change the incline; change the incline only as
described above.
5
4
3
Mode Arrows
Pulse
Sensor
Incline Leg
Pulse Indicator