


Page 2 of 9Star Trac Product Support 800-503-1221
Page 2 of 9
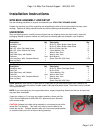
Assembly
Following these steps in order will minimize the build time and ensure proper assembly.
Note: Not all of the following procedures are performed on all models; Spinner ® Pro, Elite and NXT.
If the procedure is particular to that model only it will be noted as follows: (NXT Only) or (Pro/Elite Only)
or (NXT/Elite Only)
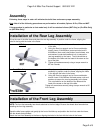
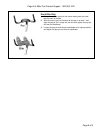
Installation of the Rear Leg Assembly
Lift up the rear of the bike frame and place the rear leg assembly in position under the frame, aligning the
holes in the leg with the holes in the frame.
NXT Only
1. Position the leg so the thicker end faces toward the front
of the bike
2. Using the 5mm hex wrench and a 13mm combination
wrench insert 2- M10X55mm (rear-most holes) and 2-
M10X65mm (front-most holes) button head screws, nuts
and washers (under bolt head and nut), to secure the
rear leg assembly to the frame. The nut should be on
the bottom of the bike and the head of the screw on the
top of the bike.
3. Tighten all hardware securely using a torque wrench to
85 Inch Pounds
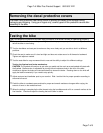
Pro & Elite Only
1. Lift up the rear of the bike frame and place the rear leg
assembly in position under the frame, aligning the holes
in the leg with the holes in the frame.
2. Using the 5mm hex wrench and a 13mm combination
wrench insert 2- M10X55mm flat head screws, nuts and
washers to secure the rear leg assembly to the frame.
The nut should be on the bottom of the bike and the
head of the screw on the top of the bike.
Tighten all screws/nuts securely using a torque wrench to 85
Inch Pounds
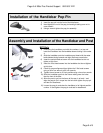
Installation of the Front Leg Assembly
NOTE: The front foot assembly has wheels attached to the front edge. Be sure the wheels face forward when
installing the front leg assembly.
Stand the bike frame upright and gently tip the front of the bike up and position the front foot under the frame,
with the wheels facing forward.
Attach the front foot assembly to the frame, aligning the holes in the foot with the holes in the frame.