8
SHOCK PUMP
Specialized offers a shock pump (4727-3010), to add or
release air pressure from your Specialized fork. The Fox
shock pump is also recommended. Follow the steps
below:
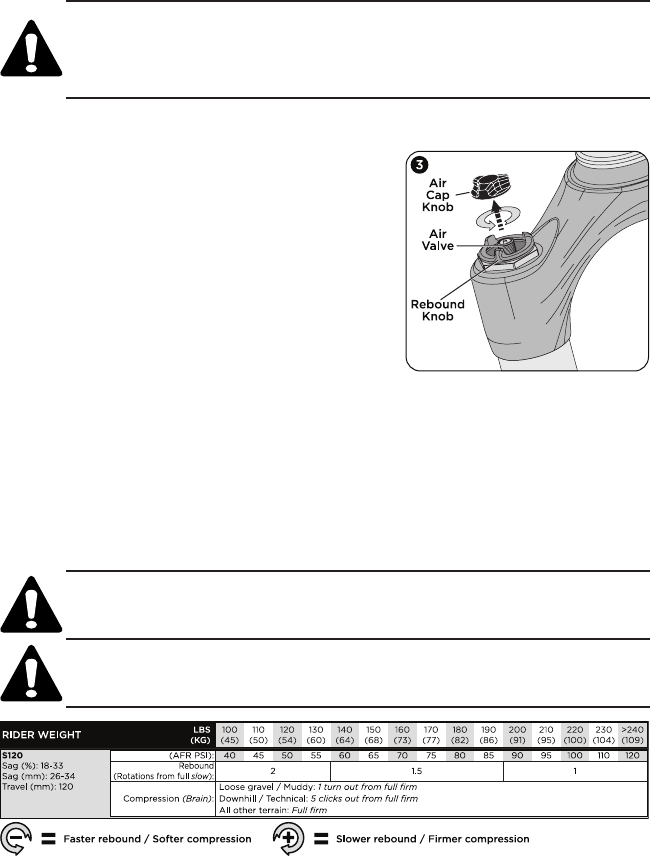
1. Remove the air cap knob from the top of the right
fork leg (Fig.3).
2. Thread the pump’s valve chuck onto the fork’s
schraeder valve (holding the rebound knob so it
won’t turn), until pressure registers on the pump
gauge. Do not over tighten the valve chuck. If
there’s no pressure in the fork, no pressure will
register on the pump gauge.
3. Stroke the pump until you’ve reached the desired pressure (see air chart for pressure
ranges). Pressure can be decreased by depressing the release valve button on the
pump body.
When the valve chuck is removed, air pressure will be released. This air is NOT from
the fork. It’s leftover air from the pump hose. When the pump is reattached to the
valve, pressure in the fork will decrease to fill the pump hose. This will lower pressure
approximately 10 PSI. (i.e. a fork set at 100 PSI will show approximately 90 PSI when the
pump’s hose is re-installed on the fork, as the hose is refilled by pressure in the fork.)
WARNING! Fork pressure range is 40 to 120 PSI. do not exceed 120 PSI.
Exceeding the recommended limit can result in damage to the fork.
WARNING! Avoid lowering pressure too far and bottoming out too often and
too hard, this can result in fork damage.
NOTE: Air pressures and rebound/compression settings are suggested recommendations
only, to provide a starting point for the rider. Adjust for preference / riding style.
Warning! Damage to composite is difficult to visually identify. If the external
composite surface is dented, frayed, gouged, deeply scratched, fractured,
chipped or otherwise damaged, the component should be replaced. If a fork
has suffered a crash or impact, Even if no damage is visible, Specialized or an
authorized Specialized dealer should inspect the product.
6. Adjust the headset to eliminate any free play, make sure that the fork rotates freely.
Align the stem with the fork. Tighten the stem’s upper and lower steerer clamp
bolts in an alternating pattern. Increase torque in 5 in-lbf (0.56 N-m) increments.
Recommended torque applied to the steerer tube is 75 in-lbf (8.5 N-m). Refer to your
stem owner’s manual for specific torque spec recommendations for the stem bolts.


