


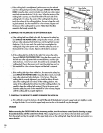
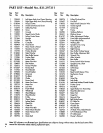

C. If thewalking belt isovertightened, performance may be reduced
and the walking belt permanently damaged. UNPLUGTHEPOWER
CORD. Using the allen wrench included, turn both rear roller adjust-
ment bolts counterclockwise 1/4_of a turn. When the tension of the
walking belt is correct, you should be able to lift each side of the
walking belt 2-3 inches; the center of the walking belt should just
touch the surface of the walking platform. Besure to keep the walk-
ing belt centered. Runthe treadmill for a few minutes. Repeat until
the tensionof the walking belt iscprrect.Note: Storethe allen
wrench in the handy wrench clip.
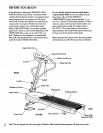
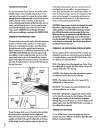
6. SYMPTOM:THEWALKING BELTISOFF-CENTEROR SUPS
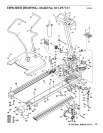
_"-3" Rear Roller
_..__en_,_lts
Wrench Clip _ _----_-_)/
a. If the walking belt has shiftedto the left, first removethe safety key
r
°and UNPLUG THEPOWER CORD. Using the allen wrench, turn the
left rear roller adjustment bolt clockwise, and the right bolt counter-
clockwise, 1/4 of a turn each. Be careful not to overtighten the
walking belt. Plug in the power cord, insertthe safetykey and run
the treadmill for a few minutes. Repeat until the belt iscentered.
b.ff the walking belt has shifted tothe right, first remove the safety
key and UNPLUG THEPOWER CORD. Using the allen wrench, turn
the left rear roller adjustment bolt counterclockwise, and the right
bolt clockwise, 1/4 of a turn each. Be careful not to overtighten the
_i_lking belt. Plug in the power cord, insert the safety key and run
_ the treadmill for a few minutes. Repeat until the belt is centered.
c. If the walking belt slipswhen walked on, first remove the safety key
.... and UNPLUG THEPOWER CORD. Using the allen wrench, turn both
_ i rear roller adjustment bolts clockwise, 1/4 of a turn. When the
walking belt iscorrectly tightened, you should be able to lift each
side of thewalking belt 2-3 inches off the walking platform. The
center of the walking belt should just touch the walking platform. Be
careful to keep the walking belt centered. Plug in the power cord,
in_rt the safety key and run the treadmill for a few minutes. Repeat
until the walking belt isproperly tightened.
7. SYMPTOM: IT ISDIFFICULTTO INSERTOR REMOVETHELOCKPIN
a. If itisdifficultto insertthe lock pin, do not hit the end of the lockpin; twisteach upper body arm slightlyin order
to align the holes.Do not twistthe upper bodyarmstoo for or the treadmill may be damaged.
STORAGE
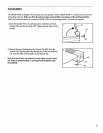
Before convertingthe CROSSWALK to the stowaway position,turn the resistancecontrol (seethe drawing on page
8) counterclockwiseuntil the controlturns freely. Next, unplugthe power cord. Removethe lock knoband washer
fromthe upright and lay the uprightand the upperbody armson the walking belt. Keep the lockknoband washer in a
securelocation.
10