


6
HOW TO USE THE EXERCISE CYCLE
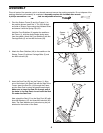
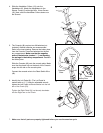
HOW TO ADJUST THE SEAT
For effective
exercise, the
Seat (21) should
be at the proper
height. As you
pedal, there
should be a
slight bend in
your knees
when the pedals
are in the lowest
position. To
adjust the Seat,
first hold the
Seat and
remove the Seat Pin (16). Align one of the holes in
the Seat Post (20) with the hole in the Frame (1).
Insert the Seat Pin into the Frame and the Seat Post.
Caution: Make sure to insert the Seat Pin through
one of the holes in the Seat Post; do not insert the
Seat Pin under the Seat Post. In addition, make
sure that the Seat Pin is inserted into the front of
the Frame and the Seat Post as shown above.
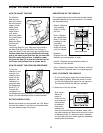
HOW TO ADJUST THE PEDALING RESISTANCE
To vary the
intensity of your
exercise, the
pedaling resis-
tance can be
adjusted. The
resistance is
controlled with
the Resistance
Knob (27). To
increase the
resistance, turn
the Resistance Knob clockwise; to decrease the resis-
tance, turn the Resistance Knob counterclockwise.
BATTERY INSTALLATION
Before the console can be operated, two ÒAAÓ batter-
ies must be installed. If you have not installed batter-
ies, see assembly step 5 on page 5.
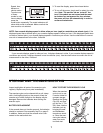
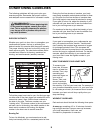
DESCRIPTION OF THE CONSOLE
The console features five modes that provide instant
exercise feedback during your workouts. The modes
are described below.
¥ SpeedÑDisplays
your pedaling
speed, in miles
per hour.
¥ TimeÑDisplays
the elapsed time.
Note: If you stop
pedaling for ten
seconds or
longer, the time
mode will pause
until you resume.
¥ DistanceÑ
Displays the total
distance you have pedaled, in miles.
¥ CalorieÑDisplays the approximate number of
Calories you have burned.
¥ ScanÑDisplays the speed, time, distance, and calo-
rie modes, for 5 seconds each, in a repeating cycle.
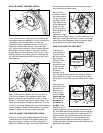
HOW TO OPERATE THE CONSOLE
1. To turn on the power, press the on/reset button or
simply begin pedaling. When the power is turned
on, the entire display will appear for two seconds.
The console will then be ready for operation.
2. Select one of the five modes:
Scan modeÑ
When the
power is
turned on, the
scan mode will
automatically
be selected.
One mode
indicator will
show that the scan mode is selected, and a flash-
ing mode indicator will show which mode is current-
ly displayed. Note: If a different mode is selected,
you can select the scan mode again by repeatedly
pressing the mode button.
21
20
1
16
27
Mode Indicators
Display
Mode Indicator