


82
82
113
73
83
71
71
72
72
3
85
83
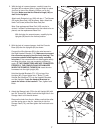
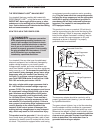
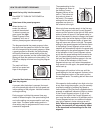
3. With the help of a second person, hold the Console
Base (85) near the Uprights (82) as shown.
Connect the Wire Harness (83) to the wire harness in
the Right Handrail Bracket (113). Make sure to connect
the connectors properly (see the inset drawing). The
connectors should slide together easily and snap
into place. If the connectors do not slide together easily
and snap into place, turn one connector and then try
again. IF THE CONNECTORS ARE NOT CONNECTED
PROPERLY, THE CONSOLE MAY BE DAMAGED
WHEN THE POWER IS TURNED ON. Insert the wire
harnesses into the right Upright (82).
Hold the Handrail Brackets (73, 113) on top of the
Uprights (82). Finger tighten two 1” Bolts (71) with
Internal Star Washers (72) into the Handrail Brackets
and the Uprights. Press the Handrail Brackets to-
wards the center of the treadmill. Then, tighten both
Bolts.
7
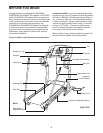
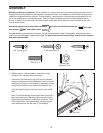
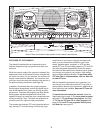
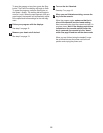
2. With the help of a second person, carefully lower the
Uprights (82) as shown. Note: It may be helpful to place
your foot on one of the Wheels (108) as you tip the
Uprights.
Make sure that the Extension Legs (106) re-
main in the Uprights.
Attach each Extension Leg (106) with two 1” Tek Screws
(25) and a Base Pad (100) as shown. Note: Attach the
lower Tek Screw (without the Base Pad) first.
Note: One replacement Base Pad (100) may be in-
cluded. If a Base Pad becomes worn and needs to be re-
placed, use the replacement Base Pad.
With the help of a second person, carefully tip the
Uprights (82) back to the vertical position.
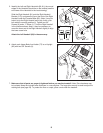
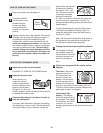
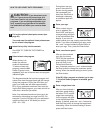
4. Attach the Storage Latch (76) to the left Upright (82) with
two 3/4” Screws (6). Make sure that the large hole in the
Storage Latch is on the side shown.
Remove the knob from the pin. Make sure that the collar
and the spring are on the pin. Insert the pin into the
Storage Latch (76), and then tighten the knob back onto
the pin.
76
6
82
Large
Hole
4
Knob
Spring
Collar
100
100
25
25
106
106
82
108
2
Pin