


11
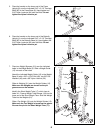
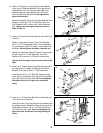
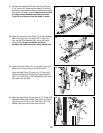
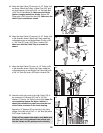
23. Remove both 3 1/2” Pulleys (24) and the Cable Traps
(25) from one set of pre-assembled Pulley Plates (23).
Wrap the Butterfly Cable (73) around a 3 1/2” Pulley
(24) in the direction shown. Attach the Pulley and the
Cable Trap (25) to the top hole in the Pulley Plates
(23) with a 3/8” x 2” Bolt (54) and a 3/8” Nylon
Locknut (50). Make sure the Cable Trap and is ori-
ented as shown in the drawing.
54
25
23
50
73
24
24
53
27
Bracket
50
1
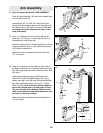
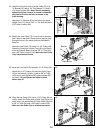
24. Wrap the Butterfly Cable (73) around a “V”-Pulley
(27) in the direction shown. Attach the “V”-Pulley and
a Large Cable Trap (32) to the welded bracket (see
the inset drawing) on the back of the Butterfly Upright
(1) with a 3/8” x 2 1/2” Bolt (53) and a 3/8” Nylon
Locknut (50). Make sure that the Large Cable Trap
is oriented as shown.
32
73
Bracket
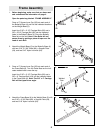
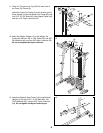
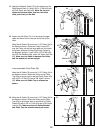
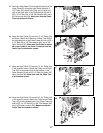
22. Wrap the Butterfly Cable (73) around a “V”-Pulley
(27) in the direction shown. Attach the “V”-Pulley and
a Large Cable Trap (32) to the bracket on the back of
the Butterfly Upright (1) with a 3/8” x 2 1/2” Bolt (53)
and a 3/8” Nylon Locknut (50). Make sure that the
Large Cable Trap is oriented as shown.
22
1
50
32
53
27
Bracket
73
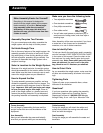
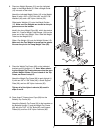
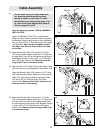
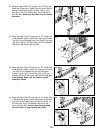
21.
Open the parts bag labeled “CABLE ASSEMBLY
AND PULLEYS.”
Identify the Butterfly Cable (73); it is the shortest
cable and has a loop on each end. Attach one end of
the Butterfly Cable to the bracket on the Left Butterfly
Arm (10) with a 3/8” x 1” Bolt (84) and two 3/8” Nylon
Jam Nuts (63). Note: Do not overtighten the bot-
tom Nylon Jam Nut; the Cable must pivot freely
on the Bolt.
21
84
10
Bracket
63
73
Cable Assembly
23
Correct cable routing is critical. Make sure
you wrap the cables around the pulleys
exactly as shown in each step. For cable
identification and routing during steps 21 to
52, refer to the Cable Diagram and Cable ID
Chart on pages 22 and 23.