


page 9
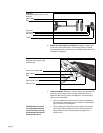
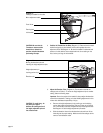
d. Replace the two bolts and washers (set aside in step 2b.). Make sure
that a washer is on each bolt. Insert a bolt—one on either side of the
treadmill—through the lower bolt hole. Note that the head of the bolt
should appear on the “outside” portion of the side rail. See Diagram 4.
Tighten the bolts using your fingers. Do not use the hex key (E) at this
time.
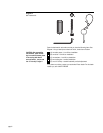
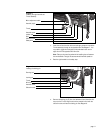
e. Remove the safety stops (A), bolts (B), and washers (C) from the
hardware kit.
f. Assemble the safety stops by placing a washer on each bolt. Insert a
bolt through each safety stop.
g. Position the safety stop so that the metal spacer on the end of the
safety stop will be against the side rail. Insert a safety stop—one on
either side of the treadmill—into the side rail’s upper bolt hole as
shown in Diagram 4 and finger-tighten.
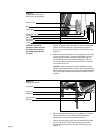
h. Securely tighten both the upper and lower mounting bolts into the
side rails using the hex key (E) provided.
i. Remove the triangular, cardboard end block from under the front of
the treadmill.
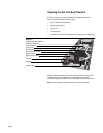
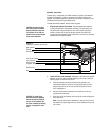
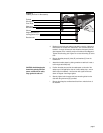
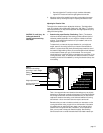
Flywheel
Elevation tube
Locking portion of pin
Running belt
Safety stop
Front lift bar
Bolt and washer
Height adjustment pin
Side rail
Diagram 4
Installing the Front Lift Bar assembly.
CAUTION: Avoid damaging the
handrails by placing the metal
spacer, attached to the safety
stop, against the side rail.