


page 14
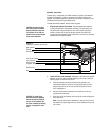
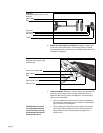
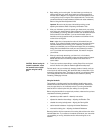
2. Position the Treadmill on Its Side. (Diagram 11) Place one hand on each
handrail and gently tip the treadmill onto its side opposite the micro-
adjustment knob. See Diagram 11. Be sure the treadmill is balanced and
secure on its side and the micro-adjustment knob is
not
resting on the
floor, before you let go of the handrails.
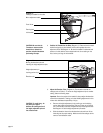
Diagram 11
Placing the treadmill on its side.
Left handrail
Running belt
Front lift bar
Micro-adjustment cable
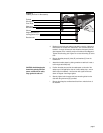
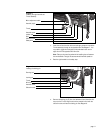
CAUTION: Be sure that the
T-knobs are secure and the
handrails are locked into
position on both sides before
performing this step.
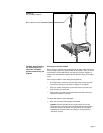
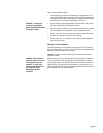
Diagram 12
Moving the elevation tube and
inserting the height adjustment pins.
3. Adjust the Elevation Tube. (Diagram 12) The elevation tube has six
settings (refer to Table 1). To move the height adjustment pin to another
setting, take the following steps.
Important: Due to the weight of the treadmill, always adjust the elevation
tube while the treadmill is resting on its side. Making adjustments in this
manner also alleviates the possibility of injury.
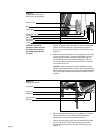
a. Remove the height adjustment pin by pushing up on the locking
portion that wraps around the tube. Use your fingers to pull the pin
out of the elevation tube hole. Repeat this step on the opposite side.
See Diagram 12. Set the height adjustment pins aside.
b. Slide the elevation tube so that the elevation tube and front lift bar
holes align at the proper setting.
Make sure that the settings are the
same on both elevation tubes.
CAUTION: To avoid injury, do
not place your fingers
between the locking portion of
the height adjustment pin and
the elevation tube.
Height adjustment pin
Locking portion of pin
Elevation tube