


12
13
Introduction
Your unit is equipped with a programmable
computer to help you track your progress and
motivate you to reach your fitness goals.
This computer provides different programs designed
to tailor to your fitness goals. Simply choose the
program you like, set the time limit and begin
exercising.Your monitor will then show your
approximate pulse, approximate calories burned,
elapsed time, speed and distance traveled.
Functions and Features
TIME: Shows your elapsed workout time in minutes
and seconds. Your computer will automatically count
up from 0:00 to 99:59 in one second intervals. You may
also program your computer to count down from a
set value by using the ▲ UP and ▼ DOWN buttons. If
you continue exercising once the time has reached
0:00, the computer will begin beeping, and reset itself
to the original time set, letting you know your
workout is done.
SPEED: Displays your workout speed in miles per hour.
DISTANCE: Displays the accumulative distance
traveled during each workout up to a maximum
of 99.9 miles. The distance will be displayed in tenths
of a mile.
CALORIES (approximate): Your computer will estimate
the cumulative calories burned at any given time
during your workout. Calorie expenditure on your
computer is based on realistic expectations; however,
your computer is not individually programmable for
all necessary variables to accurately monitor actual
calories burned.
The computer will count up in 0.1 increments. After the
display value reaches 999, it will reset to “0” and begin
counting from 0.1 again.
AGE: Your computer is age-programmable from
1 to 99 years when you choose Program 11 or
Program 12. The default age is 25 years.
Note: This unit is not recommended for children.
If you do not set an age, this function will always
default to age 30.
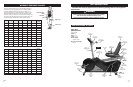
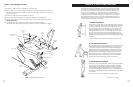
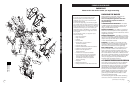
PULSE (approximate): Your computer displays your
pulse rate in beats per minute during your workout.
Pulse sensors, located on the Rear Handlebar
enable the user to read his/her pulse rate. By
grasping the sensors and holding firmly, the display
will read your pulse rate in the display window. Your
pulse will continue to read as long as your hands
stay on the pulse sensors.
When used properly, the heart rate pulse
sensors and display monitor provide a
reasonably accurate estimate of your actual
heart rate. This estimate is not exact and
persons with medical conditions and/or a
specific need for accurate heart rate monitoring
should not rely on the estimations provided.
Buttons and Definitions
MODE: This button selects functions of TIME, SPEED,
DISTANCE, CALORIES, AGE, TARGET HEART RATE,
and PULSE.
ENTER: This button allows users to set the chosen
mode for exercising. (During the STOP mode, press
the ENTER button to enter the TIME or AGE setting).
START/STOP: This button allows the user to STOP
or START exercising. (By holding this button for 2
seconds the user can reset all values to “0”). The
monitor will turn off automatically after approxi-
mately 4.5 minutes of non use. All values will then
be reset to “0”.
▲ UP BUTTON: This button allows the user to increase
the values of the TENSION LEVEL, TIME, and AGE.
▼ DOWN BUTTON: This button allows the user to
decrease the values of the TENSION LEVEL, TIME,
and AGE.
OPERATING THE COMPUTER
WARNING
The batteries must be installed as instructed
on page 8. Do not carry batteries loosely,
such as in a purse or pocket. The batteries
may explode or leak and cause injury if
installed improperly, misused, disposed
of in a fire or recharged.
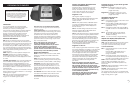
Graphic LCD Display Description and
Function (LARGE window)
This system offers 12 programs that you can
preset the workout time and will divide the
time by 10 intervals. If you do not preset the
workout time the system will count up the
workout time in one-second increments.
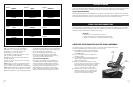
Programs 1-10:
See Program Graphics on page 14.
STEP 1 – Begin by pressing the START/STOP button
for over 2 seconds. This will clear any other
chosen function.
STEP 2 – Next press the ▲ UP or ▼ DOWN button
to scroll to the desired exercise program. Then
press ENTER. The program will be displayed on
the LCD window.
STEP 3 – The TIME setting mode should now be
displayed. Press the ▲ UP or ▼ DOWN button
to set the desired workout time.
STEP 4 – Press the START button to begin exercising.
(If you want to exit the Program, press the ENTER
button for 2 seconds and the display will reset.
Once you begin exercising your present workout
interval will be flashing.You can also increase or
decrease your workout resistance by pressing the
▲ UP or the ▼ DOWN button. To PAUSE your
exercising program, press the STOP button, then
to resume press the START button.
Programs 11 and 12:
These unique programs allow the monitor to adjust
the workout resistance according to your heart rate
automatically. Grasp the pulse sensors and hold
with a firm grip. If the current Heart Rate is greater
than the Target Heart Rate, the computer will
decrease the workout resistance automatically. If
your current Heart Rate is less than your Target
Heart Rate it will increase your resistance. By the
resistance changing, the machine will be able
to keep your heart rate at its target beats
per minute.
When used properly, the heart rate pulse
sensors and display monitor provide a reason-
ably accurate estimate of your actual heart
rate. This estimate is not exact and persons with
medical conditions and/or a specific need for
accurate heart rate monitoring should not rely
on the estimations provided.
Important: You must keep your hands on the
pulse sensors throughout the entire workout
when using Programs 11 and 12.
Important: Be sure to set your actual age when
using these programs.
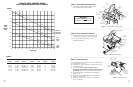
Program 11: is designed to allow you to work
out at 60% of maximum heart rate
(Target Heart Rate)
Program 12: is designed to allow you to work
out at 85% of maximum heart rate
(Target Heart Rate)
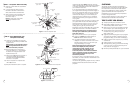
Operating Instructions for
Programs 11 and 12
STEP 1 Press START/STOP button 2 seconds to clear
out previous program.
STEP 2 Press the ▲ UP or the ▼ DOWN button to
choose the desired Heart Rate Program
(PROGRAM 11 or 12).
STEP 3 Press ENTER for TIME mode. Press the ▲ UP
or the
▲ UP button for the desired TIME set-
ting.
STEP 4 Press ENTER for AGE mode. Press the
▲ UP
or the ▼
DOWN
button for the
desired AGE setting.
STEP 5 You are now ready to begin exercising.
Graphic LCD Display Description and
Function (small window)
TIME: Press the MODE button until the arrow points
to the TIME function. If the TIME is not set, it will
count up in one-second intervals up to 99.59.
To set the desired time:
STEP 1 Press the ENTER button to enter the TIME
setting function.
Press the ▲ UP or ▼ DOWN button to
choose your desired workout time.
Range – 5:00-99:00.
STEP 2 Press START to begin. After workout time
is completed the computer will beep for 12
seconds. To stop beeping press any button.
SPEED: Press the MODE button until the arrow
points to SPEED. This will display your current
speed. The display value will be updated every
2-3 seconds.
DISTANCE: Press the MODE button until the arrow
points to the DISTANCE function.
CALORIE: Press the MODE button until the arrow
points to the CALORIE function.
The computer will count up in 0.1 increments. After
the display value reaches 999, it will reset to “0” and
begin counting from 0.1 again.