


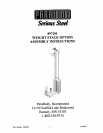
897101 WEIGHT STACK OPTION ASSEMBLY INSTRUCTIONS
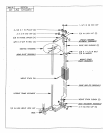
Insert two (21) GUIDE ROD BUSHINGS into the ROUND TUBES of the PULLEY HOUSING
WELDMEI~[T as shown. Also insert one (1) 1-3/4 IN SQ END CAP into the top of the PULLEY
HOUSING WELDMENT.
10. Tilt the GUIDE RODS back up to vertical. Insert the PULLEY HOUSING WELDMENT into the
UPRIGHT F]~LAME WELDMENT of the PROSYSTEM while at the same time insert the GUIDE RODS
into the GLr[DE ROD BUSHINGS of the PULLEY HOUSING WELDMENT as shown.
ll. Route the WEIGHT STACK CABLE through the front slot and down to the rear slot of the TOP
BOOM WELDMENT. LOOSELY Re-assemble the three (3) 3-1/2 X 1 IN. PULLEYS to the TOP
BOOM WELDMENT. (NOTE: MAKE SURE CABLE IS IN THE GROOVE OF THE FIRST
TWO PULLEYS ONLY).
12.
SECURELY re-assemble the TOP BOOM WELDMENT to the PROSYSTEM the same way it was
removed using the existing hardware. (MAKE SURE THAT THE BOLTS OF THE ][lOOM
SUPPORTS RUN UNDERNEATH THE CABLE INSIDE OF THE TOP BOOM)
13. LOOSELY assemble two (2) 3-1/2 X 1 IN PULLEYS to the PULLEY HOUSING WELI~tMENT
shown.
14. WEIGHT STACK CABLE ROUTING (SEE CABLE ROUTING DIAGRAM) (NOTE:
SOME PULLEYS MAY HAVE TO BE REMOVED AND REASSEMBLED IN OI~J)ER TO
ROUTE THE CABLE.
Co
Eo
Route the threaded end of the WEIGHT STACK CABLE under, and around the top 3-1/2 X 1
IN. PULLEY of the PULLEY BLOCK, and back up through the large hole on top of the TOP
BOOM WELDMENT.
Route the CABLE through the hole and over and around the two PULLEYS in the PULLEY
HOUSING WELDMENT. Run the cable down through the large hole above the WEIGHT
STACK and down to the WEIGHT STACK SHAFT ofthc HEAD PLATE.
Thread the end ofthc CABLE into the end of the WEIGHT STACK SHAFT.
Insert the 3 X 2 IN. END CAPS into the ends of the PULLEY HOUSING WELDMENT as
shown on drawing.
SECURELY tighten all loose pulley connections.
15. Re-attach LAT BAR WELDMENT to the HIGH PULLEY CABLE.
16.
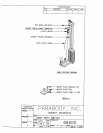
Attach the WEIGHT STACK LABELS to the WEIGHT STACK as shown in (DETAIL A).
17.
To select WEIGHT, rotate the WEIGHT STACK SELECTOR PIN clock wise 90 degrees, insert into the
slot of the desired WEIGHT PLATE, and rotate the PIN back down.
Part Number 6660001
4
12/30/96