


874104 MULTI-ANGLE BENCH ASSEMBLY INSTRUCTIONS
INSTRU
TI4E
ASSURE ITS PROPER FUNCTION.
IF YOU EXPERIENCE ANY
CONTACT YOUR DEALER OR
AT: !-80/t-328-9714
TOOLS REQUIRED: RATCHET,
RUBBER MALLET or HAMMER
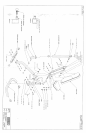
Insert one (I) U-PIN through the POST on the BENCH FRAME, as shown on drawing. Slide one (t)
X I IN. ~
~
~,ING over the U-PIN. Attach one (1) PAL NUT to the end of the U-PIN.
Insert two (2) 2 IN. SQ. END CAPS into both eiads of the REAR BASE TUBE as shown on drawing.
SECURELY assemble the REAR BASE TUBE to the BENCH FRAME as shown on drawing, using two
~ , two 3/8 IN. LOCK NUTS.
_ } ~ ~ X 3 IN. BOLTS, Ibm" (4) :/8 IN. WASHERS, and (2)
Insert two (2) 2 IN. SQ. END CAPS into both ends of the FRONT BASE TUBE as shown on drawing.
SECURELY assemble the FRONT BASE TUBE to the BENCH FRAME as shown on drawing, using
two (2) 3:3 X 3 IN. BOLTS, ibm (4) 3/8 IN. WASHERS, and two (2) 3/8 IN. LOCK
Insert one { t) 2 IN. SQ. END CAP into the end of the PAD SUPPORT as shown on drawing.
Loosely assemble the PAD SUPPORT and two (2) HINGE TABS to the BUSHING on the BENCH
FRA~E using one (I) 1/2 X 8 IN. BOLT and one (1) 1/2 LOW HEIGHT LOCKNUT. (DO NOT
TIGHTEN THE BOLT. THE PAD SUPPORT MUST ROTATE FREELY.)
Attach eight (8) PARAGLIDE STRIPS to both etads of the SWIVEL as shown in (DETAIL A) using
lk)llowing steps:
¯
I-horouglaly clean all surli~ces where the PARAGLIDE STRIPS are to be attached.
¯
Remove paper backing fi’om the PARAGLIDE STRIPS and firmly apply them to all slnown surfaces.