


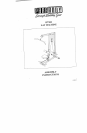

827102 LAT MACHINE ASSEMBLY INSTRUCTIONS
Ill I I I I I
Slide four (4) 1 X 8" GRIPS over the ends of the LAT BAR and the LOW ROW BAR. (NOTE: COATING
INSIDE OF THE GRIP WITH RUBBING ALCOHOL WILL FACILITATE EASIER INSTALLATION. I
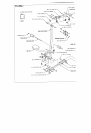
Attach eight (8) CARRIAGE GLIDES to the WEIGHT CARRIAGE as shown in (DFTAIL B) using
following steps:
A. Thoroughly clean all inside surfaces where the CARRIAGE GLIDES are to be attached.
Remove the paper backing fi’om the CARRIAGE GLIDES and firmly apply them to the WEIGHT
CARRIAGE (8 places),
9.
Attach one (i) 1-1/4" sO. RUBBER BUMPER to the WEIGHT CARRIAGE.
10.
LOOSELY assemble the REAR UPRIGHT to the BASE using two (2) 1/2 X 3" BOLTS, two (2)
WASHERS, and two (2) 1/2" LOCK NUTS.
11.
Slide the WEIGHT CARRIAGE down over the REAR UPRIGHT.
12.
LOOSELY assemble the FRONT UPRIGHT to the BASE using two (2) 3/8 X 2-3/4" BOLTS and two (2) 3/8"
LOCKNUTS.
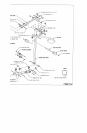
13. LOOSELY assemble the BOOM to the REAR UPRIGHT using two (2) 1/2 X 3" BOLTS, two (2)
WASHERS, one (1) I/2" LOCKWASHER, and one (1) 1/2" LOCI(NUT.
14. LOOSELY assemble two (2) 3-1/2" O.D. PULLEYS to the FRONT UPRIGHT using two (2) 3/8ex’~ .~-a,,+
~
......
BOLTS, four (4) FLANGE SPACERS and-two (2) 3/8" LOCKNUTS.
15. LOOSELY assemble the SEAT PAD to the FRONT UPRIGHT using two (2) 3/8 X 2-3/4" BOLTS and two (2)
3/8" LOCK WASHERS.
16. LOOSELY assemble two (2) 3-1/2" O.D. PULLEYS to the CONNECTOR PLATES using two (2) 3/8
BOLTS and two (2) 3/8" LOCKNUTS.
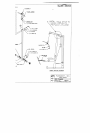
17. Route top CABLE ASSEMBLY through BOOM and CONNECTOR PLATES tl~en attach to WEIGHT
CARRIAGE with one (I) QUICK LINK. (SEE CABLE ROUTING DIAGRAM~
18. LOOSELY assemble three (3) 3-1/2" O.D. PULLEYS to the BOOM using three (3) 3/8 X 2-3/4" BOLTS,
(6) FLANGE SPACERS, and three (3) 3/8" LOCKNUTS (SEE CABLE ROUTING DIAGRAM).
19. Route bottom CABLE ASSEMBLY through the FRONT UPRIGHT and CONNECTOR PLATES and attach
end of CABLE ASSEMBLY to BASE using one (1) 3/8 X 3-1/4" BOLT, three (3) 3/8" WASHERS and one (
3/8" LOCKNUT. (SEE CABLE ROUTING DIAGRAM)
20. LOOSELY assemble the BOOM to the FRONT UPRIGHT using two (2) 3/8 ~ _-a~,+ BOLTS and two (2)
3/8" LOCKNUTS. (NOTE: MAKE SURE THE TOP CABLE ASSEMBLY IS ROUTED OVER THE TWO
BOLTS CONNECTING THE BOOM TO THE FRONT UPRIGHT)
21. LOOSELY assemble one (I) 3/8 X 2-3/4" BOLT to the FRONT UPRIGHT just below the CABLE
ASSEMBLY using one (I) 3/8" LOCKNUT.
22.
TIGHTEN ALL LOSE CONNECTIONS AT THIS TIME.
23.
Connect LAT BAR to top CABLE ASSEMBLY using one (1) SNAPHOOK and connect LOW ROW BAR
bottom CABLE ASSEMBLY using two (2) SNAPHOOKS and one (1) CHAIN.
4
12/20/95