


Our Web site at www.iFIT.com allows you to access
basic programs, audio programs, and video programs
directly from the internet. Additional options are soon
to be available. See www.iFIT.com for details.
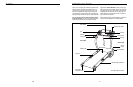
To use programs from our Web site, the treadmill must
be connected to your home computer. See HOW TO
CONNECT YOUR COMPUTER on page 20. In
addition, you must have an internet connection and
an internet service provider. A list of specific system
requirements will be found on our Web site.
Follow the steps below to use a program from our
Web site.
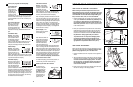
Insert the key fully into the console.
See HOW TO TURN ON THE POWER on page
11.
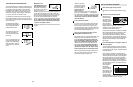
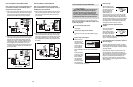
Select the iFIT.com mode.
When the key is in-
serted, the manual
mode will be selected.
To use a program from
our Web site, press the
iFIT.com button or press
the Select Program button repeatedly until the indi-
cator above the iFIT.com button lights.
Go to your computer and start an internet
connection.
Start your web browser, if necessary, and go to
our Web site at www.iFIT.com.
Follow the desired links on our Web site to se-
lect a program.
Read and follow the on-line instructions for using a
program.
Follow the on-line instructions to start the
program.
When you start the program, an on-screen count-
down will begin.
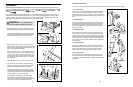
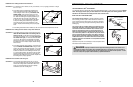
Return to the treadmill and stand on the foot
rails. Find the clip attached to the key and slide
the clip onto the waistband of your clothes.
When the on-screen countdown ends, the program
will begin and the walking belt will begin to move.
Hold the handrails, step onto the walking belt, and
begin walking. During the program, an electronic
“chirping” sound will alert you when the speed
and/or incline of the treadmill is about to change.
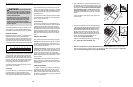
CAUTION: Always listen for the “chirp” and be
prepared for speed and/or incline changes.
If the speed or incline settings are too high or too
low, you can manually override the settings at any
time by pressing the Speed or Incline buttons on
the console. However, when the next “chirp” is
heard, the speed and/or incline will change to
the next settings of the program.
To stop the walking belt at any time, press the
Stop button on the console. The Time/Pace dis-
play will begin to flash. To restart the program,
press the Start button or the Speed + button. After
a moment, the walking belt will begin to move at 1
mph. When the next “chirp” is heard, the speed
and incline will change to the next settings of
the program.
When the program is completed, the walking belt
will stop and the Time/Pace display will begin to
flash. Note: To use another program, press the
Stop button and go to step 5.
Note: If the speed or incline of the treadmill
does not change when a “chirp” is heard, make
sure that the iFIT.com indicator is lit and that
the Time/Pace display is not flashing. In addi-
tion, make sure that the audio cable is properly
connected, that it is fully plugged in, and that it
is not wrapped around a power cord.
Follow your progress with the displays.
See step 5 on page 12.
When the program has ended, remove the key.
See step 7 on page 14.
9
8
7
6
5
4
3
2
1
14 23
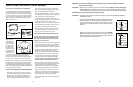
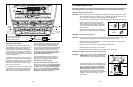
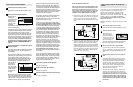
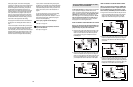
When only three seconds remain in the first seg-
ment of the program, both the Current Segment
column and the column to the right will flash and a
series of tones will sound. If the speed and/or in-
cline of the treadmill is about to change, the
Speed display and/or the Incline/Heart Rate dis-
play will flash to alert you. When the first segment
is completed, all speed settings will move one col-
umn to the left. The speed setting for the second
segment will then be shown in the flashing
Current Segment column and the treadmill will au-
tomatically adjust to the speed and incline settings
for the second segment. Note: If all of the indica-
tors in the Current Segment column are lit after
the speed settings have moved to the left, the
speed settings will move downward so that only
the highest indicators appear in the program dis-
play. If some of the indicators in the Current
Segment column are not lit when the speed set-
tings move to the left again, the speed settings will
move back up.
The program will continue until the speed setting
for the last segment is shown in the Current
Segment column and no time remains. The walk-
ing belt will then slow to a stop.
If the speed or incline setting for the current
segment is too high or too low, you can manually
override the setting by pressing the Speed or
Incline buttons. Every few times a Speed button is
pressed, an additional indicator will light or darken
in the Current Segment column. (If any of the
columns to the right of the Current Segment col-
umn have the same number of lit indicators as the
Current Segment column, an additional indicator
may light or darken in those columns as well.)
Note: When the next segment begins, the
treadmill will automatically adjust to the speed
and incline settings for the next segment.
To stop the program temporarily, press the Stop
button. The Time/Pace display will begin to flash.
To restart the program, press the Start button or
the Speed + button. To end the program, press
the Stop button, remove the key, and then reinsert
the key.
Follow your progress with the displays.
See step 5 on page 12.
Measure your heart rate if desired.
See step 6 on page 12.
Turn on the fans if desired.
See step 7 on page 13.
When the program has ended, remove the key.
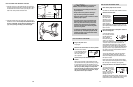
Step onto the foot rails and make sure that the in-
cline of the treadmill is at the lowest level. The in-
cline must be at the lowest level when the
treadmill is raised to the storage position.
Next, remove the key from the console and put it
in a secure place. Note: If the displays and indi-
cators on the console remain lit after the key
is removed, the console is in the “demo”
mode. Refer to page 24 and turn off the demo
mode.
When you are finished using the treadmill, move
the on/off switch near the power cord to the off
position and unplug the power cord.
7
6
5
4
HOW TO USE PROGRAMS DIRECTLY FROM
OUR WEB SITE