


3.5 CONNECT WIRING / ATTACH COVER
Parts: Hardware Bag #3 (4, 12mm Phillips Screws)
(4, Flat Washers)
Tools: Phillips Screwdriver
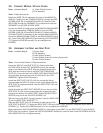
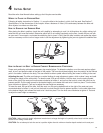
Detach the WIRE TIE (H) attached to the front of the MONOCOL-
UMN (E). Carefully pull the CONSOLE WIRE (L) through the SIDE
ACCESS HOLE (M) of the MONOCOLUMN (E). Feed the CON-
SOLE WIRE through the GROMMET (N) as shown and insert the
GROMMET into the SIDE ACCESS HOLE.
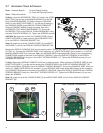
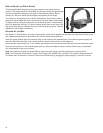
Connect the WIRE (K) leading from the MONOCOLUMN BRACKET
(J) to the corresponding CONSOLE WIRE (L) from the SIDE
ACCESS HOLE (M) of the MONOCOLUMN (E). Slide the MONO-
COLUMN COVER (F) downward to the meet the MAIN SHROUDS.
Secure the MONOCOLUMN COVER to the MAIN SHROUDS using
four 12mm PHILLIPS SCREWS (6) and matching FLAT WASHERS
(7). Tighten the SCREWS securely. Do not overtighten the
SCREWS.
3.6 ASSEMBLE THE SEAT AND SEAT POST
Parts: Hardware Bag #4 (3, Nylock Nuts)
(3, Flat Washers)
(2, 8mm Phillips Screws)
(1, 6mm Phillips Screw with Locking Compound)
(2, 6mm Phillips Screws)
Tools: 13mm Socket Wrench, Phillips Screwdriver
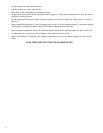
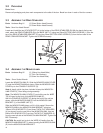
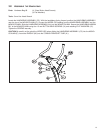
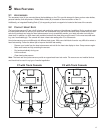
Locate the SEAT (O) and SEAT POST (P). Remove the three
NYLOCK NUTS (8) and FLAT WASHERS (9) from the threaded
studs on the bottom of the SEAT. Align the threaded studs of the
SEAT with the mounting holes in the SEAT POST MOUNTING
PLATE (Q). Secure the seat to the SEAT POST MOUNTING PLATE
using the three previously removed NYLOCK NUTS and FLAT
WASHERS. Tighten the NUTS securely.
Locate the SEAT POST CAP (R). With the curved side facing
upward toward the SEAT (O) and the inside notch aligned with the
SEAT POST (P) adjustment decal, slide the SEAT POST CAP over
the SEAT POST
Locate and slide the SEAT POST SPACER (S) over the end of the
SEAT POST (P). Be sure the locking tabs fully engage the holes
located at the bottom of the SEAT POST. Secure the SEAT POST
SPACER using two 8 mm PHILLIPS SCREWS (10).
With the nose of the SEAT (O) facing forward, insert the SEAT POST
(P) into the SEAT POST SUPPORT (T).
Slide the SEAT POST CAP (R) downward to meet the top of the
SEAT POST SUPPORT (T). Secure the SEAT POST CAP to the SEAT POST SUPPORT using two 6mm PHILLIPS
SCREWS (11). Tighten the SCREWS securely. Do not overtighten the SCREWS.
Begin inserting the SEAT ADJUSTMENT KNOB (U). Lift upward on the SEAT (O) and SEAT POST (P) until the SEAT
POST locks into a position. Tighten the SEAT ADJUSTMENT KNOB fully. Insert the 6mm PHILLIPS SCREW W/LOCK-
ING COMPOUND (12) and tighten securely.
11
Q
9
8
R
11
S
12
U
T
10
P
O