


INSTALLATION
22
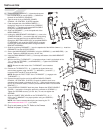
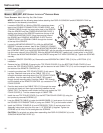
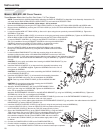
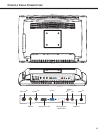
13 Locate the COAXIAL COUPLER (u). Remove the RETAINING NUT (v) and two WASHERS (w
& x) from the COUPLER. Insert the COUPLER into the large D-SLOT located at the front of the
MOTOR PAN (y). Secure the COUPLER using the two WASHERS and RETAINING NUT previ-
ously removed. Tighten the NUT securely. Attach the COAXIAL CABLE (e) leading from the
LEFT UPRIGHT to the top of the COUPLER. Attach the BROADCAST SUPPLY CABLE (z) to
the bottom of the COUPLER.
NOTE: Be sure to leave at least 12” of excess BROADCAST SUPPLY CABLE (z) between the
floor and the coaxial connection on the unit to accomodate elevation of the unit.
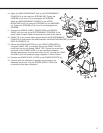
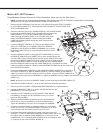
14 Remove the RETAINING NUT (aa) and WASHER (bb) from coupler end of the POWER CORD
(d) leading from the LEFT UPRIGHT. Position the coupler into the small D-SLOT located at the
front of the MOTOR PAN (y). Secure the COUPLER using the WASHER and RETAINING NUT
previously removed. Tighten the NUT securely.
Mount the POWER ADAPTER (cc) to the bottom of the MOTOR PAN (y) using two CABLE
TIES (j). Be sure the CABLE TIES are pulled tight and trim the excess CABLE TIES. Connect the
screw-type connector of the POWER CORD (dd) to the underside of the POWER CORD COUPLER.
Bundle excess POWER CORD and store under the unit.
NOTE: Be sure the POWER ADAPTER (cc) and CABLE TIES (j) do not interfere with the LIFT
MECHANISM.
15. Connect the POWER SUPPLY CORD to the POWER ADAPTER (cc).
16. Continue with the remainder of assembly as instructed in the Assembly Instructions. Plug the
POWER SUPPLY CORD into an electrical outlet upon completion.