


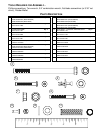
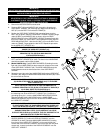
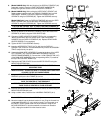

21. Remove the tape securing the WAX TRAY (H) to the FRAME (A). Locate the WAX BAG (J). Position the HOSE CLAMP (K) over
the WAX BAG HOSE (L) approximately three inches from the end of the WAX BAG HOSE. Engage the HOSE CLAMP.
22. Cut off the end of the WAX BAG HOSE (L) approximately 1/2" from the end of the hose.
23. Position the WAX BAG (J) so the WAX BAG HOSE (L) faces the user left side and the WAX BAG FLANGE faces the front of the
treadmill. Slide the end on the WAX BAG HOSE over the BARBED CONNECTOR (M) leading from underside of the MOTOR
PAN (N). Disengage the HOSE CLAMP (K).
CAUTION: IT IS VERY IMPORTANT TO DISENGAGE THE HOSE CLAMP (K). FAILURE TO DO SO MAY RESULT IN
DAMAGE TO THE TREADMILL.
ATTENTION: IL EST TRÈS IMPORTANT DE DÉSENGAGER LE COLLIER DE LA CONDUITE (K). LE MANQUE DE FAIRE
AINSI PEUT AVOIR COMME CONSÉQUENCE LES DOMMAGES AU TAPIS ROULANT.
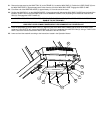
24. Place the WAX BAG (J) into the WAX TRAY (H). Align the holes of the WAX BAG FLANGE with the holes of the WAX TRAY.
Using two PUSH RIVETS (#6), secure the WAX BAG and TRAY to the underside of the MOTOR PAN (N). Using a THIRD PUSH
RIVET, secure the left end of the WAX TRAY to the underside of the MOTOR PAN.
25. Lower and level the treadmill according to the instructions located in the Operation Manual.
A
N
K
L
H
J
6
M