


Assembly
6
WARNING: Do not plug treadmill in until assembly is complete. Failure to follow this warning could
result in electrical shock and/or injury.
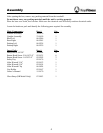
CAUTION: Keys Fitness recommends using two people to assemble the treadmill. Before beginning,
read all instructions and become familiar with the parts. In addition, look at the motor
controller circuit board on the base and find the slot where the wire harness plugs in.
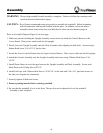
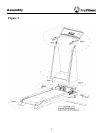
Refer to Assembly Diagram (Figure 2) on next page.
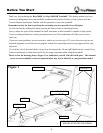
1. While one person is holding the Upright Assembly secure in the air, attach the Console Harness to the
Lower Board. Place excess cable inside the left upright.
2. Slowly lower the Upright Assembly onto the Deck Assembly while aligning the bolt holes. Secure using 6
Button Head Screw 5/16-18*3/4” on the sides.
3. Attach the Lower Console Harness into the Upper Console Harness. Place excess cable into the left upright.
4. Attach the Console Assembly onto the Upright Assembly and secure using 2 Button Head Screw 5/16-
18*3/4.
5. Install Plastic Boots to cover the gaps between the Upright Assembly and Deck Assembly. Secure each
Metal Boots with 3 Philip Screw #8*5/8”.
6. Install End Caps with 2 Button Head Screw 1/4-20*3/4” on the ends and 2 #8 x 5/8” pan head screws on
the sides (see diagram for orientation).
7. Securely tighten all bolts and screws.
8. Remove packing material before starting treadmill.
9. Be sure that the treadmill is level to the floor. The rear feet can be adjusted to level the treadmill.
Assembly is now complete!