


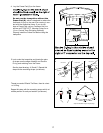
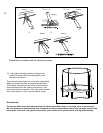

6. Using the included plastic tie, attach the Safety
Placard (11) to the frame near the point where
jumpers will climb onto and off the trampoline.
The trampoline is now fully assembled. Make
sure that all parts are securely attached.
Familiarize yourself and all users of the tram-
poline with the safety precautions, use and
instructional materials, and care and mainte-
nance instructions in this manual before using
the trampoline.
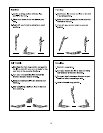
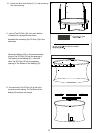
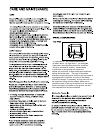
Loosen the straps (not shown) on the underside of
the frame pad (for clarity, the frame pad is not shown
in the steps 8 and 11). Do not remove the frame pad
from the trampoline.
See the inset drawing.
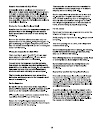
6
Frame
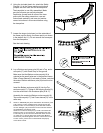
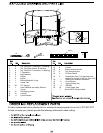
8. Lay a Bottom enclosure pole(16) and a Top enclo-
sure pole (17) with Plastic Cap on the ground.
9.
18
7.
Slide a ‘WEDGE’(23) onto the Botom enclosure pole
(16), the top of the ‘Wedge’(23) should touch the
bottom of the T-Connector(4), and that the bottom
of the ‘Wedge’ (23) should be even with the bottom
of the Bottom enclosure pole.
Slide one of the U-bolts(15) up until it touches the
bottom of the T-connector(4), and tighten the two
Locknuts(13) on the U-bolt. Slide the other U-bolt
up until it is 2” above the lower end of the Botom
enclosure pole,and tighten the two Locknuts on the
U-bolt. Then, press two U-bolt Plastic Caps(24)
onto each U-bolt.
15
14
13
24
T-connector
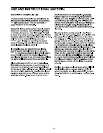
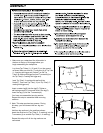
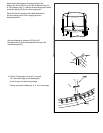
Make sure that the Bottom enclosure pole(16) is
oriented so the small holes are in the position shown.
Slide a Foam Sleeve(21) onto each of tubes; note that
the ends of Bottom enclosure pole(16) should not be
covered.
Insert the Bottom enclosure pole(16) into the Top
enclosure pole(17). Tighten a Self-tapping Screw(12)
into the small hole in the Enclosure pole(16 & 17).
Assembly the remaining Bottom enclosure pole(16),
Top enclosure pole(17), and Foam sleeves(21) in the
same way.