


16
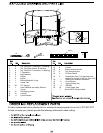
Frame
Holes
V-rings
8
10
10
10
10
Springs (10)
22
Hook the V-ring
V-ring
8
10
10
Frame
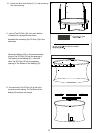
Black webbing with yellow line
No yellow line
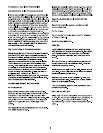
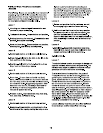
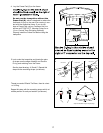
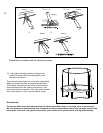
3. Lay the Bed (8) on the ground inside of the
assembled frame. Make sure that the two warn-
ing decals (not shown) are on top of the Bed.
Note: There are V-rings around the edge of the
Bed (8) and holes around the top of the frame.
During this step, you will attach the Bed to the
frame using the included Springs (10) for holes
on top of frame and for holes on bottom of frame
(see the inset drawing). Hook a spring to the
Bed(8) and using the spring pulling tool(22), pull
the spring from the Bed to the hole slot in the
trampoline frame with even spring tension.
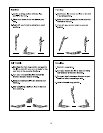
Be careful where you place your hands, the
Springs and frame joints can pinch.
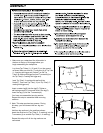
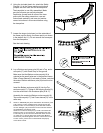
To attach each Spring, you will rst hook one end
of the Spring into a V-ring with black webbing
with yelow line location (see the inset drawing).
Hook the rst two Spring(10) into two the V-rings
(black webbing with yellow line) on the Bed(8) and
into the holes on the top tube. Attach two more
Springs (10) with black with yellow line location
directly across the Bed (with the webbing) from the
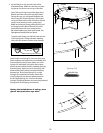
rst two Spring. Attach two more Spring(10) with
black webbing with yellow line location halfway
between the rst/second Spring(10), so eight
Springs(10) are attached as shown. Attach four
more Springs(10) (not shown) halfway between
the rst eight Springs(10). Continue attaching
Springs(10) halfway between the previously attached
Springs,until all the Springs are attached.
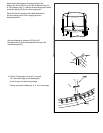
During the installations of spring, wear
gloves and protective eye wear.