


8
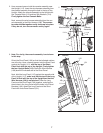
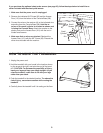
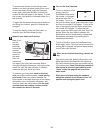
4. Identify the Right Handrail (86) and the Left Handrail (89);
the Handrails have indented holes in the outer sides for
t
he heads of the Handrail Bolts (90).
H
old the Right Handrail (86) on the right side of the tread-
mill. Loosely thread two Handrail Bolts (90) into the
bracket on the Right Handrail and into the console assem-
bly. Do not tighten the Handrail Bolts yet. Attach the
Left Handrail to the left side of the treadmill in the same
way. Then, slide the Upper Handrail (93) onto the Right
and Left Handrails.
Next, slide a Handrail Bracket (32) onto the lower end of
the Right Handrail (86). Insert two Handrail Bracket Bolts
(31) with two Washers (116) into the Right Handrail and
the Handrail Bracket, and finger tighten the Handrail
Bracket Bolts into the Frame (28).
Do not tighten the
Handrail Bracket Bolts yet. Attach the lower end of the
Left Handrail (89) in the same way.
86
89
93
32
116
28
31
90
Console
Assembly
4
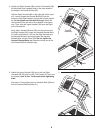
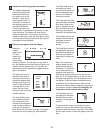
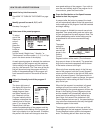
5. Attach the Upper Handrail (93) to the Left and Right
Handrails (86, 89) with four 3/4” Tek Screws (91) (only two
are shown); start all four Tek Screws before tightening
them.
See step 4. Firmly tighten the four Handrail Bolts (90) and
the four Handrail Bracket Bolts (31).
86
91
89
93
5