


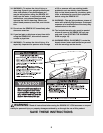
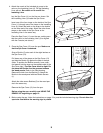

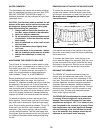


4. Attach the nozzle of the included air pump to the
valve on the Insulating Liner (4). Fill the Insulating
Liner with air. Be careful not to overfill the
Insulating Liner.
Lay the Spa Cover (11) on the floor as shown. Set
the Insulating Liner (4) inside the Spa Cover.
Insert one of the four straps on the inside of the Spa
Cover (11) through one of the loops on the Insulating
Liner (4). Attach the latch on the strap to the buckle
on the other end of the strap. Attach the other three
straps on the inside of the Spa Cover to the
Insulating Liner in the same way.
Place the Spa Cover (11) over the spa, making sure
that the cutout in the Insulating Liner (4) is aligned
with the Console (not shown).
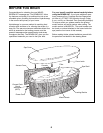
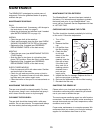
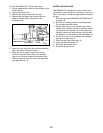
5. Place the Spa Cover (13) over the spa. Make sure
that the Spa Cover is centered.
Snap a Buckle (2) onto each of the eight latches on
the Spa Cover (13).
Pull down one of the straps on the Spa Cover (13)
and hold the Buckle (2) against the side of the spa.
(Note: To position the Buckle correctly, have a sec-
ond person hold the strap on the opposite side of the
Spa Cover tight.) The Spa Cover must be tight. Do
not place the Buckle over the grooves between
the wood panels. Refer to the inset drawing.
Remove the latch from the Buckle (2). Attach the
Buckle to the wood panel with two Buckle Screws
(1).
Attach the other seven Buckles (2) to the wood pan-
els in the same way.
Remove the Spa Cover (13) from the spa.
Before using the spa, carefully read USING THE
RENEW 207 beginning on page 10.
9
1
Latch
Strap
2
2
13
5
4
11
Straps
Loops
Loops
Cutout
4
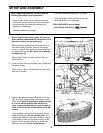
6. Before using the spa, follow the instructions on page 10 to post the included warning sign. Do not allow the
spa to be used before the warning sign is posted.