


12
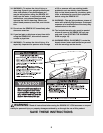
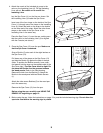
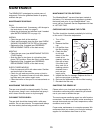
SECURING THE SPA COVER
To secure the spa cover, snap the latches on the spa
cover into the buckles on the side of the spa.
To lock the buckles,
insert the key and
turn it clockwise 1/4
turn. To unlock the
buckles, insert the
key and turn it coun-
terclockwise 1/4 turn.
After the spa cover is
secured, you can fur-
ther tighten it by
adjusting the self-
attaching flaps on
each end of the spa
cover.
Always keep the
buckles locked
when the spa is not
in use. Keep the keys in a safe place, out of the
reach of children.
Key
Adjustment
Flaps
Latch
Buckle
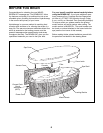
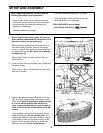
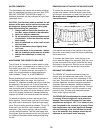
Refer to the diagram above. The function of each fea-
ture is explained below:
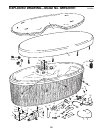
The three fixed thera-jets (A), located on one end of
the spa, focus a water massage on your back.
The three adjustable thera-jets (B) can be adjusted
for a custom water massage. One of the jets focuses
a water massage on your lower back, a second jet
focuses a water massage on your upper back, and a
third jet near the floor of the spa focuses a water mas-
sage on your legs. Note: The adjustable thera-jets
can be closed and opened by pushing and pulling the
nozzles. If no air flows through the thera-jets when the
air control is turned counterclockwise, simply pull the
nozzles slightly.
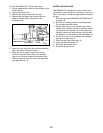
The filter (C) can be removed for cleaning and
replacement (see CHECKING AND CLEANING THE
FILTER on page 13).
The suction vents (D), located near the floor of the
spa, bring water into the pump in order to operate the
system. The suction covers should always be in place
over the suction vents. Never operate the spa with-
out the suction covers in place.
The spa is ozone ready. An optional ozone generator
can be installed to utilize the ozone jet (E). Ozone
provides a way to help sanitize your spa with minimal
chemical treatment.
A
B
B
C
E
D
SPA JET OPERATION