


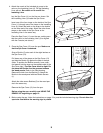


1. Before beginning assembly, make sure that you
have read and understand the information in the
box above and on the previous page.
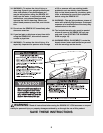
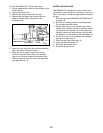
Remove the four screws from the access cover on
the console side of the spa. Remove the access
cover by sliding it down and then pulling the bottom
of it away from the spa. Be careful not to damage
the Spa Shell (15).
Remove the Power Cord with the GFCI (9) from
inside the spa.
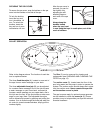
2. Close the valve knob on the drain hose. Tighten the
two pump fittings.
Refer to step 1 above. Re-attach the access cover
with the for screws.
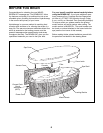
3. Remove the warning decals (not shown) from the
Spa Shell (15). Using a damp cloth, wipe the Spa
Shell clean. Before filling the spa, make sure that
it is in the desired position and that there is
room to easily service the spa. Once the spa is
filled, it will have to be drained before it can be
moved.
Using a garden hose or other clean water source,
begin filling the spa. Do not use soft water. The
spa may be filled with cold water; however, if warm
or hot water is used, the spa will be ready for use
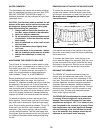
sooner. Fill the spa until the water is at the level
shown at the right. Do not overfill the spa.
SETUP AND ASSEMBLY
Before beginning assembly, carefully read the
following information and instructions:
¥ Place all parts of the spa in a cleared area and
remove the packing materials from the spa shell;
do not dispose of the packing materials until
assembly is completed.
¥ Assembly requires two people.
¥ Read each assembly step before you begin.
¥ During assembly, make sure that all parts are
turned as shown in the drawings.
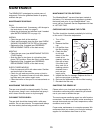
TOOLS REQUIRED (not included):
¥ One Phillips screwdriver
Fill to here
15
Screws
Console
15
9
1
Pump
Fittings
2
3
8
Access
Cover
Valve Knob
11
Drain Hose
Screws