


22
INTRODUCTION
IMPORTANT
PRECAUTIONS
BEFORE
YOU BEGIN
TREADMILL
OPERATION
LIMITED
WARRANTY
TROUBLESHOOTING
& MAINTENANCE
CONDITIONING
GUIDELINES
ASSEMBLY
BEFORE
YOU BEGIN
ASSEMBLY
23
INTRODUCTION
IMPORTANT
PRECAUTIONS
TREADMILL
OPERATION
CONDITIONING
GUIDELINES
TROUBLESHOOTING
& MAINTENANCE
LIMITED
WARRANTY
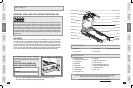
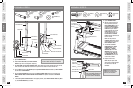
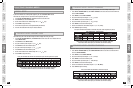
You can save a workout in any of the 4 save workout locations.
At the end of your workout, the console will prompt you if you would like to save your completed
workout by scrolling SAVE WORKOUT.
If you would like to save the workout, press the SAVE WORKOUT key.
The 1 SAVED WORKOUT LED will light up. FREE or FULL will display on the console. FREE indicates
that this location is empty. FULL indicates a previously saved workout is already saved to that par-
ticular location. You may save to either a FREE or FULL location, however if you choose to save to a
FULL location the previously saved workout will be deleted and replaced with the new workout.
Press the SAVE WORKOUT key until you have selected the desired save workout location you would
like to save your workout.
Press and hold the SAVE WORKOUT key for 5 seconds to save the workout for future use. The con-
sole will beep 3 times if the workout is saved.
1
2
3
4
5
SAV IN G A W OR KO UT
E NT E RTA I NM EN T I N FO RM AT IO N
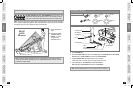
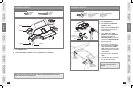
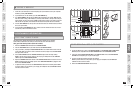
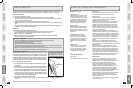
The Horizon Fitness iPod Docking Station is the entertainment solution for your workouts.
Various models of iPod with a dock connector can fit with the use of the included inserts.
Using your iPod Docking Station (iPod not included)
Remove the RUBBER PLUG from bottom of the DOCKING STATION.
Place the DOCK INSERT that fits your iPod model into the DOCKING STATION.
Plug in your iPod by matching the DOCK CONNECTOR PIN on the treadmill with the dock connector
on your iPod. NOTE: If you want to connect a different sized iPod, simply lift out the DOCK INSERT
and replace with a new one.
Use the IPOD CONTROLS below the DOCKING STATION to adjust volume and song settings.
NOTE: If you don’t want to use the speakers, you can plug your headphones into the AUDIO OUT
JACK on right of the IPOD DOCKING STATION.
Replace the RUBBER PLUG into the bottom of the DOCKING STATION when the station is not in use.
NOTE: iPod audio will not play through speakers if the AUDIO ADAPTOR CABLE is plugged in while
iPod is in the DOCKING STATION.
To adjust the volume you must use the IPOD CONTROLS located under the docking station. NOTE:
if you don’t want to use the speakers, you can plug your headphones into the AUDIO OUT JACK on
front left side of the console.
1
2
3
4
6
7
U SI N G iPo d
®
AU D IO P L AY E R
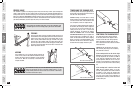
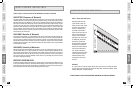
Leave RUBBER PLUG at bottom of DOCKING STATION.
To hold your MP3 player in place in the DOCKING STATION, use the UNIVERSAL MP3 PLAYER INSERT.
NOTE: Only iPod is compatible with the DOCK CONNECTOR PIN in the IPOD DOCKING STATION.
Connect the included AUDIO ADAPTOR CABLE to the AUDIO IN JACK on left of the IPOD DOCKING
STATION and the headphone jack on your CD / MP3 player.
Use your CD / MP3 player buttons to adjust song settings.
NOTE: if you don’t want to use the speakers, you can plug your headphones into the AUDIO OUT
JACK on front left side of the console.
Remove the AUDIO ADAPTOR CABLE when not in use.
1
2
3
4
5
U SI N G NO N- i Po d
®
M P 3 / CD PL AYE RS
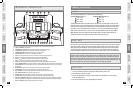
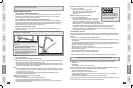
iPod
®
Docking Station
Dock Connector Pin
iPod
®
Controls
Rubber Plug
iPod
®
Controls
iPod
®
Dock Inserts
Note: Dock insert sizes
vary for each iPod.
Universal MP3 Player
Dock Insert
Dock Insert
Audio In Jack
Audio Out Jack
(front of console)
Speakers
iPod
®
Controls
T901_Rev.2.0.indd 22-23 9/10/08 11:16:02 AM