


12
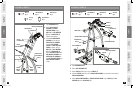
INTRODUCTION
IMPORTANT
PRECAUTIONS
ASSEMBLY
BEFORE
YOU BEGIN
CONDITIONING
GUIDELINES
TROUBLESHOOTING
& MAINTENANCE
LIMITED
WARRANTY
13
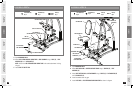
INTRODUCTION
IMPORTANT
PRECAUTIONS
ASSEMBLY
BEFORE
YOU BEGIN
CONDITIONING
GUIDELINES
TROUBLESHOOTING
& MAINTENANCE
LIMITED
WARRANTY
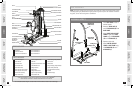
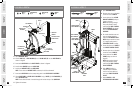
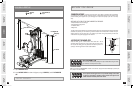
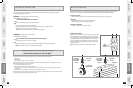
Open HARDWARE BAG 5.
Install 2 BOLTS (I), 4 FLAT WASHERS (j) and 2 NYLON NUTS (K) into the BASE FRAME as
shown in diagram.
Insert each GUIDE ROD into the BASE FRAME as shown in diagram.
Install rubber BUMPER onto each GUIDE ROD.
Install each WEIGHT PLATE onto GUIDE RODS
NOTE: Ensure that each WEIGHT PLATE’s selector pin slot faces downward.
Insert each GUIDE ROD into the corresponding hole in the UPPER PULLEY ASSEMBLY.
Secure GUIDE RODS in UPPER PULLEY ASSEMBLY using 2 BOLTS (I), 4 FLAT WASHERS (j)
and 2 NYLON NUTS (K).
NOTE: Ensure that each bolt is inserted through the hole at the top of the GUIDE ROD.
Tighten all hardware.
A
B
C
D
E
F
G
H
A S S E M B LY S T E P 6
FLAT WASHER (J)
Qty: 8
NYLON NUT (K)
Qty: 4
BUMPER
Qty: 2
BOLT (I)
Qty: 4
HARDWARE BAG 5 CONTENTS :
BUMPER
GUIDE ROD
WEIGHT PLATES
TOP WEIGHT PLATE
BAYONET
SELECTOR PIN
NYLON NUT (K)
FLAT WASHER (J)
UPPER PULLEY
ASSEMBLY
FLAT WASHER (J)
BOLT (I)
FLAT WASHER (J)
FLAT WASHER (J)
NYLON NUT (K)
BOLT (I)
BASE FRAME
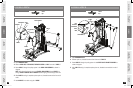
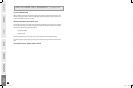
Open HARDWARE BAG 6.
Remove nylon nut and threaded
screw from end of CABLE A.
Insert cable end into LAT BAR
BRACKET ASSEMBLY pulley as
shown in diagram.
NOTE: After passing through
first pulley bracket, thread
cable through DUAL FLOATING
PULLEY BRACKET then thread
back into LAT BAR BRACKET
ASSEMBLY.
Re-install threaded screw and
nylon nut before threading
cable into TOP WEIGHT PLATE.
NOTE: Always maintain at least
½˝ of weight cable screw in
TOP WEIGHT PLATE for saftey.
Screw the other end of CABLE A
into SINGLE FLOATING PULLEY.
Remove nylon nut and threaded
screw from end of CABLE B.
Insert cable end into BASE
FRAME pulleys as shown in
diagram.
NOTE: After passing through
first pulley bracket, thread
cable through DUAL FLOATING
PULLEY BRACKET.
After CABLE B routing is
complete replace threaded
end and nut onto cable end,
and install SINGLE FLOATING
PULLEY.
Attach CABLE B to LEG
EXTENSION/CURL ARM CABLE.
A
B
C
D
E
F
G
H
I
A S S E M B LY S T E P 7
CABLE A
Qty: 1
CABLE B
Qty: 1
HARDWARE BAG 6 CONTENTS :
DUAL FLOATING
PULLEY BRACKET
SINGLE FLOATING
PULLEY BRACKET
CABLE A
SCREW AND NUT
LEG EXTENSION/
CURL ARM CABLE
TOP WEIGHT
PLATE
CABLE B
CABLE A
CABLE A
SINGLE FLOATING
PULLEY BRACKET
SXS_5.7_rev.1.1.indd 12-13 8/30/07 11:12:54 AM