


7
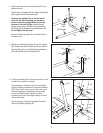
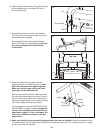
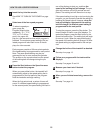
2. Have a second person hold the Base (52) in the
position shown.
Identify the Left Upright (53) (the Right Upright [54]
h
as a large hole near the lower end).
Hold the Left Upright (53) so the two small
holes for the latch assembly are on top as
shown. Insert two Upright Bolts (2) into the
bracket on the Left Upright. Attach the Left
Upright to the Base (52) with the Upright Bolts,
two Upright Star Washers (9) and two Nuts (16).
Do not tighten the Nuts yet.
Attach the Right Upright (54) to the Base (52) in
the same way.
2
52
53
16
2
2
16
9
9
9
9
54
Large
Hole
Small Holes
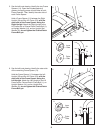
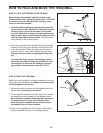
3. Slide the two Wheel Housings (45) onto the Base
(52). Attach each Wheel Housing with two Wheel
Housing Bolts (13), two Wheel Housing Washers
(32), and two Wheel Housing Nuts (43).
3
52
13
32
32
45
43
13
32
32
45
43
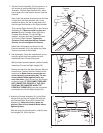
4. Position the Base (52) as close to the front of the
treadmill as possible, as shown.
See drawing 4a. Wrap the wire tie in the Right
Upright (54) around the end of the Wire Harness
(39). Then, pull the other end of the wire tie until
the Wire Harness is extending from the upper
end of the Right Upright. Secure the Wire
Harness to the top of the Right Upright so that it
will not fall inside.
See drawing 4b. Press the indicated Grommet
(49) into the Right Upright (54).
52
4
39
54
54
54
49
39
52
Wire Tie
4b
4a
39