INSPECTION AND MAINTENANCE
INSPECT YOUR TOTAL GYM ® 1000 PRIOR TO EACH USE
Before using your Total Gym® 1000 for your workout session, be sure to make the
following inspection:
• Make sure the equipment is fully opened and sitting on a solid level surface with plenty
of clearance on all sides. Unit should be used on carpeted surfaces only.
• Make sure all the hitch pins and the height adjustment “C” pin are securely in place
and locked into position.
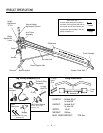
• Check that the pulley is attached securely to the hook on the front underside of the
glideboard.
• Check that the cables are traveling correctly in the groove of each pulley.
• Make sure the cable is securely fastened to each hand grip.
• Check that the wing accessory is installed correctly when in use.
• Make sure the glideboard is gliding smoothly along the frame.
ROUTINE MAINTENANCE
• Wipe down your Total Gym® 1000 on a regular basis using a clean cloth and alcohol or
alcohol-based products like Windex
®
or 409
®
. Do not leave towels or workout clothing
laying or hanging on the equipment.
• Periodically check the following parts for signs of fraying or other wear: the cable, the
pulleys, the wheels, the glideboard, the wing accessory and the frame. If a part needs
to be replaced, do not use the equipment until it is repaired.
• Never use a lubricant such as WD-40
®
or ArmorAll
®
to lubricate or clean the unit. Use
only 3-in-1
®
oil or machine oil to lubricate the axles of the wheel or pulley, not the roller
surface.
TO STORE YOUR TOTAL GYM® 1000
Follow these easy steps to store your Total Gym® 1000 properly:
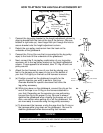
1. First, remove the wing accessory and leg pulley accessory.
2. Be sure the arm pulley cable is attached to the underside of the glideboard for folding.
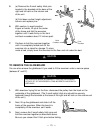
3. Position one foot on back crossbar to keep the product from lifting off the floor. With
one hand on the rail, grasp the height adjustment “C” pin and pull it out from the height
adjustment column. Slowly lower the rails until they rest on the back crossbar.
4. Next, lower the height adjustment column all the way down until it rests on the center
rail.
— 12 —


