


5
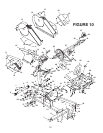
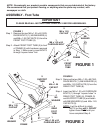
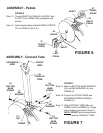
FIGURE 1
Step 1. Remove the two M8 x 1.25 x 60 CAR-
RIAGE BOLTS (1), M8 WASHERS (4)
and M8 x 1.25 CAP NUTS (5) from the
FRONT FOOT TUBE (2).
Step 2. Attach FRONT FOOT TUBE (2) to front
of FRAME (3) with hardware removed
in Step 1. Make sure to insert BOLTS
through "square holes" first.
2
FRONT
FOOT
TUBE
1
M8 x 1.25 x 60
CARRIAGE BOLT
4
M8
WASHER
3
FRAME
5
M8 x 1.25
CAP NUT
IMPORTANT
PLEASE READ ALL INSTRUCTIONS CAREFULLY BEFORE ASSEMBLING.
ASSEMBLY - Foot Tube
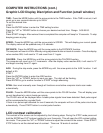
FIGURE 1
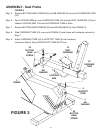
FIGURE 2
1
M8 x 1.25 x 60
CARRIAGE BOLT
4
M8
WASHER
5
M8 x 1.25
CAP NUT
5
M8 x 1.25
CAP NUT
9
SUPPORT
TUBE
8
REAR
FOOT
TUBE
3
FRAME
4
M8
WASHER
FIGURE 2
Step 3. Remove the two M8 x 1.25 x 60 CAR-
RIAGE BOLTS (1), M8 WASHERS (4)
and M8 x 1.25 CAP NUTS (5) from the
REAR FOOT TUBE (8).
Step 4. Insert two M8 x 1.25 x 60 CARRIAGE
BOLTS (1) through "square holes" in
REAR FOOT TUBE (8), FRAME (3)
and SUPPORT TUBE (9) and fasten
with M8 WASHERS (4) and M8 x 1.25
CAP NUTS (5).
NOTE: It will be difficult to attach
NUTS, but they
will fit. DO NOT
tighten these NUTS until you
have completed Step 9.
NOTE: Occasionally our products contain components that are pre-lubricated at the factory.
We recommend that you protect flooring, or anything else the parts may contact, with
newspaper or cloth.