


Assembly
5
6
4
5
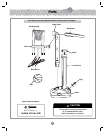
Backboard
Fisher-Price
®
Logo
Peg
Groove
Wall
Rim
Upper Post
Fisher-Price
®
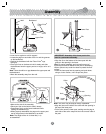
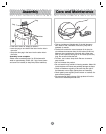
• Move to the side of the assembly.
• Place your foot on the base to hold it steady.
• Press down firmly on the lower backboard while
rotating the backboard up.
• When properly assembled, the pegs on the upper post
rest in the grooves in the backboard, as shown.
Note: The height of the rim is three feet (1 m)
as assembled.
Top View
PULL HERE
PRESS HERE
Peg
Peg
Grooves
Back View
6
4
5
Lower Post
Rib
Groove
Base
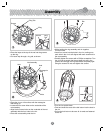
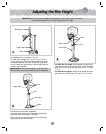
IMPORTANT! Assembly of the lower post to the
base is a permanent assembly.
Note: The collar may already be factory assembled.
• Align the lever on the side of the collar with the opening in
the top of the lower post.
• Fit the collar onto the lower post, making sure the peg on
each side of the collar snaps into the hole on each side of
the post.
Collar
Lever
Opening
Lower
Post
Hole
Peg
10
9 11
12
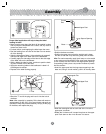
• Lean the rim against a wall for support.
• Locate the pegs on each side of the rim and the grooves
on the backboard.
• Position the backboard with the Fisher-Price
®
logo
facing up.
• Place your foot on the base to hold it steady and slide
the backboard onto the upper post at an angle, as far as it
will go.
Note: There should be no gap between the upper post and
the backboard.
• Move the assembly away from the wall.
• Align the rib on the bottom of the lower post with the
groove in the opening in the base.
Hint: For easier assembly, apply a small amount of
liquid soap around the bottom of the post. If assembling
indoors, place a tarp under the base to protect the floor
surface.
• Insert the lower post into the opening and push down,
using a circular motion, until it snaps into place.