


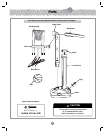

Assembly
4
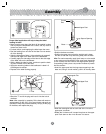
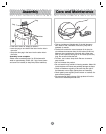
Side Edge
• Bend the “T” end of the plug and insert it into the hole in
the base.
Note: After assembly is complete, fill the base with water or
approximately 50 lbs. (22.7 kg) of sand (water and sand not
included) to keep this product stationary. Simply lift the plug,
fill the base, and replace the plug.
Plug
“T” End
Base
4
5
6
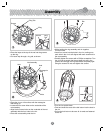
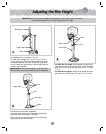
Large Square Opening
Base
Upper Post
Curved
End
• Position the base as shown.
• Position the upper post so that the straight end is down
and the curved end is up and facing away from the base.
Hint: For easier assembly, apply liquid soap or rub a candle
or bar soap around the bottom of the upper post (especially
on the corners) and the inside of the large square opening.
If assembling inside, place a tarp under the base to protect
the floor surface.
• Insert the upper post into the large square opening in the
base and, using a circular motion, push it all the way down.
4
5
6
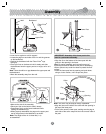
• Hook the rectangular tab on each side of the rim to the
upper post, as shown.
• Rotate the rim down until it snaps into place on the upper
post. Push down on the rim to be sure it is secure.
Rectangular Tab
Rim
Upper Post
6
5
7
8
Proper label application will help to keep the label
looking its best!
• Make sure the area where the label will be applied is clean
and dry. Wipe the backboard with a clean, soft, dry cloth to
remove any dust or oils.
• For best results, avoid applying the label more than once.
• Peel the backing from one half of the label. Do not remove
all of the backing!
• Align the side edge of label 1 (where backing is removed)
with the side edge of the label area on the backboard.
• Carefully apply the side edge of the label to the side edge
of the label area on the backboard.
• While rubbing the label in place, continue to peel the back-
ing from the other half of the label.
• Apply the remaining labels to the backboard. Labels 2-5
are designed to overlap.
• Dispose of the label backing properly.
Side Edge
3
2
4
5
1