


You can also press DST
repeatedly until you hear a beep
sound to enable and disable the
Daylight Saving Time function
manually.
If
DST was not set and you
press the SET button until you
hear the beep, DST is then
enabled, DST will appear on the
LCD and an hour will be added
to standard time.
If DST is set and you keep
pressing SET until you hear a
beep, DST is then disabled, DST
will disappear from the LCD and
an hour will be subtracted in
order to return to standard time.
If you replace the batteries, the
Daylight Saving Time function
will be returned to its factory-
preset state. Remember then to
enable or disable the
DST func-
tion as explained above.
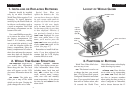
TO VIEW OTHER NAMES AND
INFORMATION ABOUT CITIES
WITHIN A SELECTED TIME ZONE
Press CITY until you see the
name of the city you want. (If
you do not find it, the city is not
in the globe’s database.) Then, to
view information about the
selected city, hold down CITY for
at least a second and watch as
information alternates on the
screen.
HOME TIME DISPLAY
When your local time zone is
displayed, you can press HOME
TIME
to display HOME TIME rather
than the name of a city on the
LCD. Press HOME TIME again to
return to the city name.
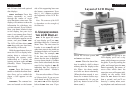
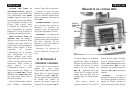
SETTING THE ALARM
ON LOCAL TIME
To set the alarm, press the
ALARM button until a bell
appears on the screen at the left.
Then press SET. SET ALARM will
appear then at the top of your
screen, and the hour digits will
flash. Use the
UP or DOWN button
to scroll to the correct hour, and
then press SET. (Or simply press
SET a second time if you don’t
wish to change the hour.)
Next the minutes will flash.
Press the UP or DOWN buttons to
select the minutes, and then
press SET. The time you want
your alarm to go off is now set.
The alarm will sound for one
minute and then shut off auto-
matically, or you can shut it off
by pressing any button.
INTERNATIONAL ALARM CLOCK
This is a special feature which
can come in very handy. Perhaps
you are at home in Chicago and
want Chicago time to be dis-
played on the screen, but you
need to remember to call some-
one in Bangkok at 5 pm
Bangkok time. Here’s what to
do: turn the globe until the Time
Zone Bar is aligned with
Bangkok. Bangkok’s local time
appears on the screen. Next set
the alarm to 5 pm. (See instruc-
tions beginning on page 9 for
setting the alarm.) After setting
the alarm, turn the globe back to
your location (in this example,
Chicago.) Chicago time will
then be displayed on the screen,
but the alarm will sound when it
is 5 pm in Bangkok.
TURNING DST ON OR OFF
World Time Globe Mini
knows when and where to add or
subtract for standard and
Daylight Saving Time. However,
in the event that a city adopts a
new arrangement with respect to
DST, you might need to turn DST
on or off manually.
To do this, press
DST for
longer than a second until you
hear a short beep. DST will either
appear or disappear on the LCD.
If you change your mind and
need to reverse your action, sim-
ply press DST again for longer
than a second until you hear
another short beep.
10
ENGLISH ENGLISH
This device complies with Part 15 of the FCC Rules. Operation is subject to the following two conditions:
(1) this device may not cause harmful interference, and (2) this device must accept any interfer
ence
received, including interfer
ence that may cause undesired operation.
NOTE: This equipment has been tested and found to comply with the limits for a Class B digital device,
pursuant to Par
t 15 of the FCC Rules. These limits are designed to pr
ovide reasonable l interference in a
residential installation. This equipment generates, uses and can radiate radio fr
equency energy and, if not
installed and used in accordance with the instructions, may cause harmful interference to radio communi-
cations. However
, there is no guarantee that interfer
ence will not occur in a par
ticular installation. If this
equipment does cause harmful interference to radio or television reception, which can be determined by
turning the equipment off and on, the user is encouraged to try to correct the interference by one or more
of the following measures:
• Reorient or relocate the receiving antenna.
• Increase the separation between the equipment and receiver.
• Connect the equipment into an outlet on a cir
cuit different from that to which the receiver is
connected.
• Consult the dealer or an experienced radio/TV technician for help.
11