


Next the flashing indicator
tells you to set the date, begin-
ning with the year. Press UP or
DOWN until you arrive at the cor-
rect year, then press SET. Then
use the UP or DOWN buttons to
scroll to the correct month, and
press SET. Finally, press UP or
DOWN to input the day of the
month, and press SET. (The day
of the week adjusts automatical-
ly according to the date you have
set.)
CHOOSING 12- OR 24 HOUR
CLOCK AND DATE DISPLAYS
You can choose to have the
time displayed according to
either the 12 or the 24 hour clock
system. You can also choose
between two formats for display-
ing the date, YYYY/MM/DD or
DD/MM/YYYY. (For example,
2003 4 29 can be changed to 29
4 2003.) With the alarm dis-
abled, press SET six times until
12 HOUR or 24 HOUR appears at
the top of the screen. Press UP or
DOWN repeatedly until both the
time display and the date display
are in the format you prefer. You
can press SET to exit this menu,
or simply wait 10 seconds until
the main display returns to the
screen.
Or, after setting the time and
date and pressing SET, you’ll see
that either 12 HOUR or 24 HOUR
appears then at the top of the
screen. Press UP or DOWN repeat-
edly to select the desired date
and time formats, and then press
SET. (If you don’t wish to
change the current setting, sim-
ply press SET.) To escape this
menu, press SET twice, or wait
10 seconds until the LCD returns
to the main display.
CHOOSING FAHRENHEIT OR
CENTIGRADE
When the alarm is disabled,
press SET repeatedly until either
FAHR or CENT appears at the top
of the screen. Next push UP or
DOWN once to select the alternate
temperature indicator. Then
press SET, or just wait ten sec-
onds, allowing the LCD to return
to the main display.
Or, after setting the time, date
and 12 or 24 hour clock, you’ll
see that either
CENTIGRADE or
FAHRENHEIT will flash at the top
of the display. You can use the
UP or DOWN buttons also at this
time to change the setting, and
then press SET. (If you don’t
wish to SET change the current
setting, simply press SET.)
9
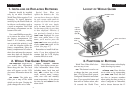
alternate with the monthly mean
temperature.
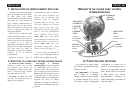
TIME: In the center of the LCD,
the current hour, minute and sec-
onds are shown for the selected
time zone. (The time will adjust
as the globe is turned.) If the
alarm function is set, the display
shows the alarm time.
DATE AND DAY OF THE WEEK:
The date and day of the week in
a time zone are shown below the
time display. You can select from
two formats, MM/DD/YYYY or
YYYY/DD/MM).
DST: If the city you have
selected operates on Daylight
Saving Time, World Time Globe
Mini automatically adds one
hour to standard time and dis-
plays
DST on the LCD. If a city
doesn't operate on Daylight
Saving Time, or if DST is not cur-
rently in effect for that location,
World Time Globe Mini knows
to subtract an hour to revert to
standard time. (You can also
enable or disable the
DST func-
tion if necessary. See page 10.)
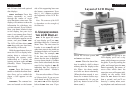
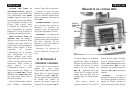
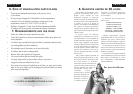
5. USING THE
BUTTONS
SETTING YOUR LOCAL
TIME AND DATE
First check that the alarm is
off. (No bell should be on the
display.) If the alarm is enabled,
press
ALARM once to disable it.
Next position the Time Zone
Bar by the city or location you
are in. (You can verify that you
have positioned the bar appropri-
ately by pressing CITY. Names of
cities which share your time
zone should appear consecutive-
ly on the screen.)
Then press SET. (SET TIME
should appear at the top of the
display and the hour digit will
flash.) Use the UP or DOWN but-
tons to scroll through the num-
bers until you arrive at the cor-
rect hour, and press SET. (If you
don’t need to change the hour,
simply press SET a second time
to jump to the minutes.) Next the
minutes will flash. Press UP or
DOWN to scroll through numbers
until you arrive at the correct
minutes. (If you don’t need to
change the minutes, simply press
SET a second time to jump to the
date.) Press SET.
8
ENGLISH ENGLISH