


Owner’s Manual
5
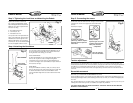
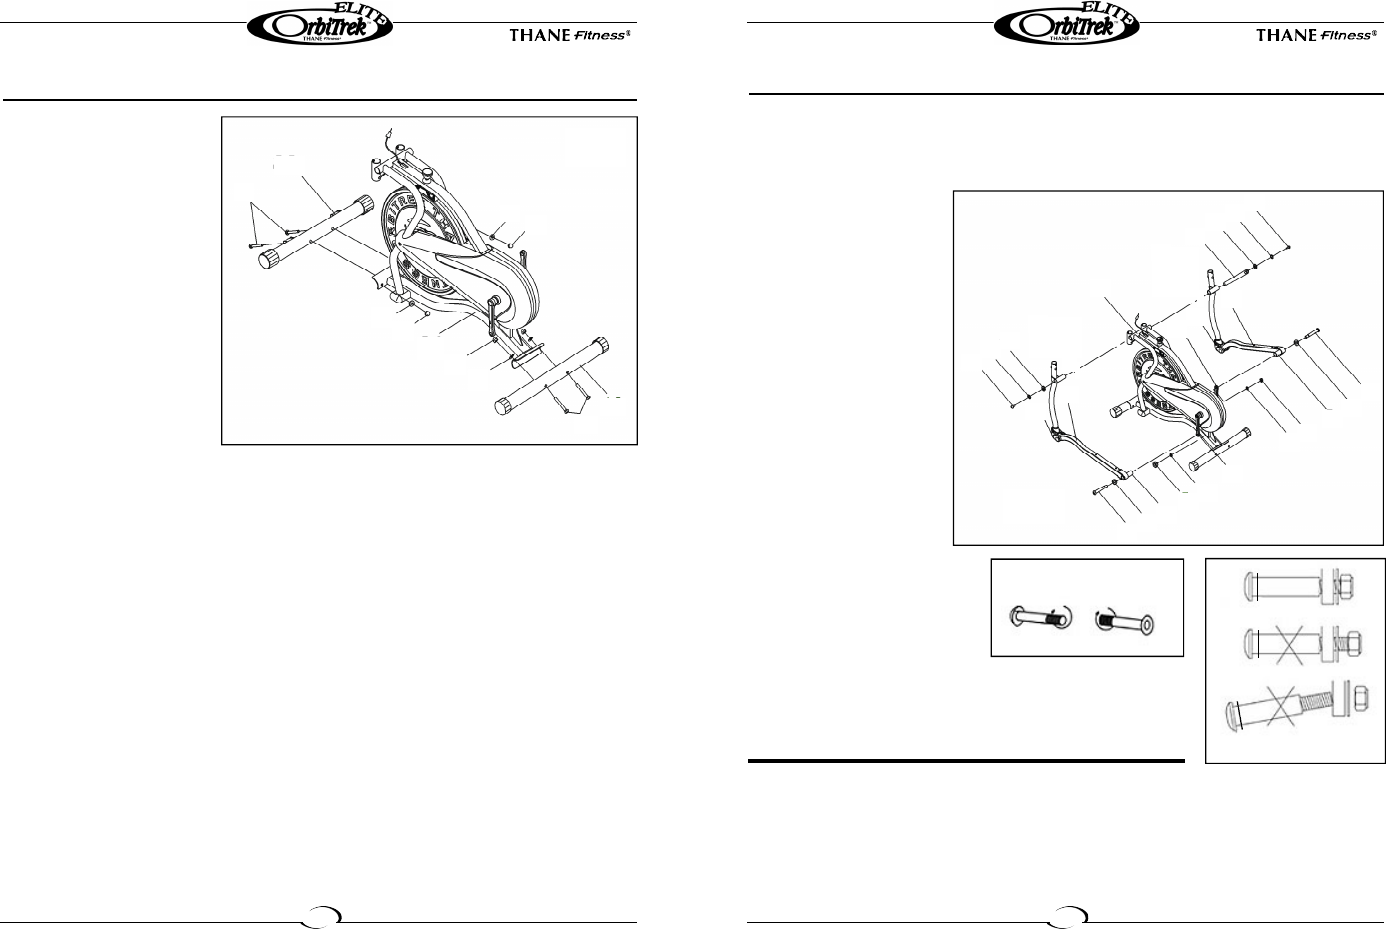
Step 2: Attaching the Spindle Bar
Insert the Spindle Bar (No. 38) through the Right Connecting Tube (No. 55) into the main frame,
into Left Connecting Tube (No. 24). Put a D Shaper Washer (No. 33) and a Spring Washer (No. 32)
on either side of the Spindle Bar and tighten both ends using the Hinge Screws (No. 31).
2 – “D” Shaped Washers (No. 33)
2 – Spring Washers (No. 32)
2 – Hinge Screws (No. 31)
Insert the Right Hinge Bolt
(No. 42) with the Arc Washer
(No. 93) through the Pedal Post
(No. 19 for the right side).
Put Spring Washer (No. 6) on
the bolt, then pass the Right
Hinge Bolt (No. 42) through
the Crank (No. 91) and secure
the bolt with the Right Lock
Nut (No. 89).
1 – Right Hinge Bolt (No. 42)
1 – Left Hinge Bolt (No. 1)
2 – Arch Washer (No. 93)
2 – Spring Washer (No. 6)
1 – Right Lock Nut (No. 89)
1 – Left Lock Nut (No. 7)
Repeat this procedure for the
left side.
Owner’s Manual
4
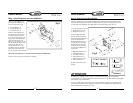
Attach the Front Stabilizer (No.
23) and the Rear Stabilizer (No.
10) to the main frame using:
4 – Carriage Bolt (No. 9)
4 – Arc Washers (No. 11)
4 – Domed Nuts (No. 12)
Place the Front Stabilizer (No.
23) against the main frame and
be sure the holes line up. Take
two of the Carriage Bolts (No. 9)
and pass them through the tube
supports located on the unit.
Slip the two Arc Washers (No. 11)
over the threaded portions of the
carriage bolts. Place the two
Domed Nuts (No. 12) over the
Arc Washers (No. 11) and firmly
tighten down the Domed Nuts
(No. 12) using the wrench provided.
Notice: The Front Stabilizer (No. 23) has wheels for moving your Orbitrek Elite.
Follow the same procedure for attaching rear stabilizer.
Step 1: Attaching front and rear stabilizers
ATTENTION:
The Right and Left Hinge Bolt (No. 42 & No. 1) must fully penetrate the nylon ring inside the
Connecting Tube (No. 5) and the Right and Left Crank (No. 91 & No. 83). This will ensure the stability
and durability of you Orbitrek Elite.
In order to install hinge bolt properly, keep it perfectly straight as the bolt goes through the pedal
tubing and the crankshaft. If the hinge bolt is connected to the crankshaft at an angle, damage to
both the hinge and the crankshaft may occur.
#1: LEFT #42: RIGHT
CORRECT
INCORRECT
INCORRECT
Fig. 1
9
12
11
23
10
9
11
12
12
11
36
Fig. 2
31
93
32
33
31
36
91
24
5
83
6
19
5
42
89
38
93
19
6
32
33
1
55
7