D
Remove the battery
cover held by four
screws on the bottom
of the lantern. Use
as small Phillips
screwdriver to remove
the screws.
D
Assemble the AAA
battery into the
compartment.
Observe polarity.
D
Replace the battery
cover.
NOTE: Use an AAA alkaline battery only. Do not
use a nickle cadmium battery. Remove your
battery if you won’t be using your lantern for an
extented time period.(Fig.5)
English-3
D
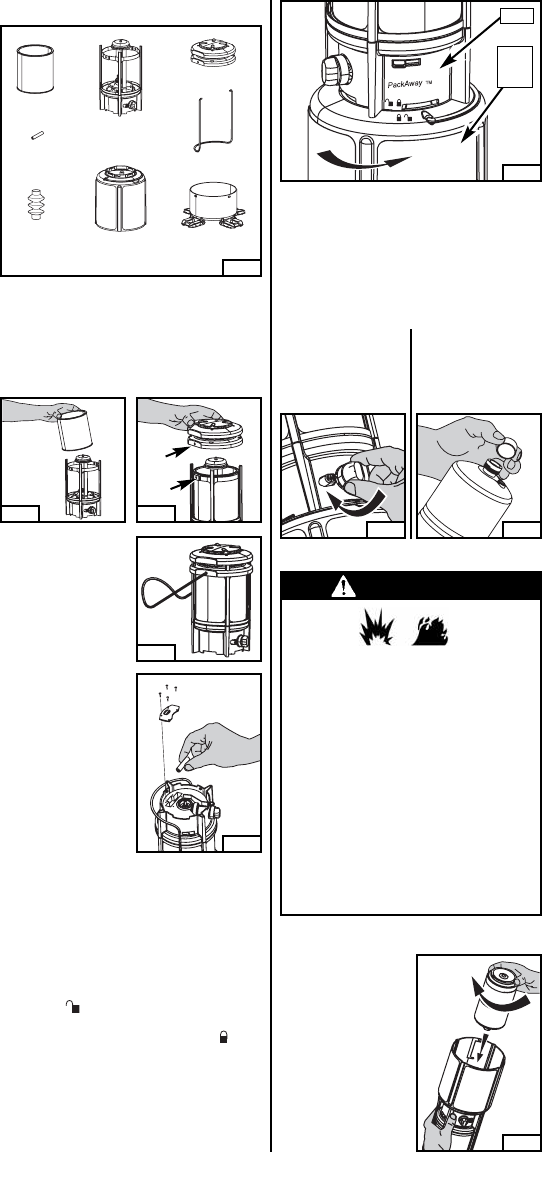
Remove lantern parts from package.(Fig. 1)
Lower Carrying
Case
Lantern Frame
Mantle
D
Assemble globe inside lantern frame.(Fig.2)
D
Assemble ventilator. The vertical lantern frame
rails slip through the holes in the ventilator.Be
sure the holes for the bail (indicated by arrows)
align on both sides of the lantern.(Fig. 3)
Fig. 3
D
Take lantern out-
doors away from
ignition sources.
D
Turn fuel valve off.
(Fig. 7)
D
Remove protective
cap from top of
propane cylinder.
Save cap for use
in storing.(Fig. 8)
NOTE: Use Coleman 16.4 oz. disposable propane
cylinders.The LP-gas cylinder(s) used with lanterns
must be constructed and marked in accordance
with the specifications for LP-gas cylinders of the
U.S.Department of Transportation or
Transport
Canada, CAN/CSA B339
.
Fig. 7 Fig. 8
DANGER
• EXPLOSION - FIRE HAZARD
• Propane is heavier than air and can accumu-
late in low places.If you smell gas, leave the
area immediately.
• Always attach or detach propane source out-
doors;never while lantern is lighted, near
flame, pilot lights, other ignition sources or
while lantern is hot to touch.
• Always light & use lantern outdoors.
• This lantern must not be exposed to flamma-
ble vapors or liquids during lighting.
• This lantern is red hot during use and can
ignite flammables too close to the mantles.
Keep flammables at least 12 inches from the
sides and 48 inches from the top of the
lantern. Keep gasoline and other flammable
liquids and vapors well away from lantern.
D
Screw propane
cylinder into lantern.
Take care not to
cross-thread. Hand
tighten only. (Fig.9)
Fig. 9
Fig. 2
Globe
Ventilator
Bail
Upper Carrying
Case
AAA Battery
D
Assemble bail as
shown with handle
toward back of the
lantern. (Fig. 4)
Fig. 4
Fig. 5
Fig. 6
Upper
Carry
Case
Collar
Fig. 1
D
Install upper carry case. Align the unlock
symbol “ “ on the collar with the unlock
symbol on the upper carry case. Rotate the
upper carry case until the lock symbol “ “ on
the collar aligns with the lock symbol on the
upper carry case (Fig. 6).


