


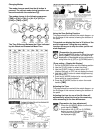

[Time adjustment]
1. Pull the ࠗ
M (MODE) button out to the
setting position. The time is displayed
in the digital section with the hours, minutes and
seconds blinking. (At this point, daylight-saving
time ON/OFF can be selected by pressing the ࠗ
C
(SET) button.)
2. Press the ࠗ
A (SELECT) button. The desired
segment of hours, minutes or seconds will blink in
sequence. The segments blink in the following
sequence: [hours, minutes and seconds] ➡
[seconds] ➡ [minutes] ➡ [hours] ➡ [switching
between 12- and 24-hour systems] ➡ [hours,
minutes and seconds].
3. Use the ࠗ
C (SET) button to adjust the blinking
segment.
4. Push the ࠗ
M (MODE) button in to its normal
position. Time adjustment is now completed.
Adjusting the Calendar
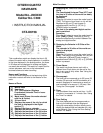
This page should be read with the watch diagram, on
the first page of this manual, showing the location of
the parts.
Adjusting the calendar for one of the 30 cities
will automatically adjust the calendar for the
remaining cities, according to the time
differences.
[Preparation for calendar adjustment]
1. Press the ࠗ
M (MODE) button to move the
mode hand to [CAL].
2. Press either the ࠗ
A (UP)
button or ࠗ
C (DOWN) button
to select the desired city.
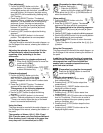
[Calendar adjustment]
1. Pull the ࠗ
M (MODE) button out to the
setting position. The day of the week
(MO, TU, etc.) displayed in the digital
section disappears and the month number starts
blinking.
2. Press the ࠗ
A (SELECT) button. The desired
segment of the date will blink in sequence.
The segments in the following sequence:
[month] ➡ [date] ➡ [year] ➡ [month]
3. Use the ࠗ
C (SET) button to adjust the blinking
segment.
4. Push the ࠗ
M (MODE) button in to its normal
position. Calendar adjustment is now completed.
*There is no need to adjust the day of the week
since it is corrected automatically.
Using the Alarm
This page should be read with the watch diagram, on
the first page of this manual, showing the location of
the parts.
The operation of Alarms 1[AL-1], 2[AL-2] and
3[AL-3] are the same; only their tones are different.
Once an alarm is set, it sounds at the same time
every day until it is cancelled (set to OFF).
[Preparation for alarm setting]
Example: Setting AL-1
1. Press the ࠗ
M (MODE)
button to move the mode hand to [AL-1].
2. Press either the ࠗ
A (UP) or ࠗC (DOWN) button to
select the desired city.
[Alarm setting]
1. Pull the ࠗ
M (MODE) button out to the
setting position.
2. Press the ࠗ
A (SELECT) button. The desired
segment of the time will blink in sequence.
The segments blink in the following sequence:
[Alarm ON/OFF] ➡ [hours] ➡ [minutes] ➡ [alarm
ON/OFF]
3. Use the ࠗ
C (SET) button to adjust the blinking segment.
4. Push the ࠗ
M (MODE) button in to its normal position.
Alarm adjustment is now completed.
5. Press the ࠗ
M (MODE) button to return the mode
hand to [TME].
* To turn the alarm off, press either the ࠗ
A , ࠗB , ࠗC or
ࠗ
M button.
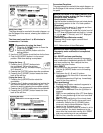
Using the Chronograph
This page should be read with the watch diagram, on
the first page of this manual, showing the location of
the parts.
In addition to the normal function of measuring
the time from a starting to a stopping point, this
chronograph has a split time function that
enables you to measure elapsed time at any
point from start to finish.
[Preparation for using the chronograph]
Press the ࠗ
M (MODE) button to move the
mode hand to [CHR].
[Using the chronograph - 1]
1. Pressing the ࠗ
A (START) button starts
time measurement.
2. Pressing the ࠗ
A (STOP) button stops time
measurement.
3. Pressing the ࠗ
C (RESET) button returns the
displayed numbers to zeros.
[Using the chronograph - 2]
1. Pressing the ࠗ
A (START) button starts time
measurement.
2. Pressing the ࠗ
C (SPLIT) button returns the elapsed
time for 10 seconds. (This function is useful in
measuring elapsed time upon passing a point
during a marathon, etc.)
3. Pressing the ࠗ
A (STOP) button stops the time
measurement.
4. Pressing the ࠗ
C (RESET) button returns the
displayed digits to zeros.