


Operation Guide 5266
E-42
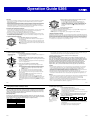
To set an alarm time
1. In the Alarm Mode, use
D
and
B
to scroll through the alarm
screens until the one whose time you want to set is displayed.
−1 −2 −3
SIG −5 −4
2. Hold down
A
until the alarm time starts to fl ash. This is the setting
screen.
3. Press
C
to move the fl ashing between the hour and minute
settings.
4. While a setting is fl ashing, use
D
(+) and
B
(–) to change it.
• When setting the alarm time using the 12-hour format, take care
to set the time correctly as a.m. or p.m.
5. Press
A
to exit the setting screen.
To test the alarm
In the Alarm Mode, hold down
D
to sound the alarm.
E-43
To turn an alarm and the Hourly Time Signal on and off
1. In the Alarm Mode, use
D
and
B
to select an alarm or the Hourly
Time Signal.
2. When the alarm or the Hourly Time Signal you want is selected,
press
A
to toggle it between on and off.
• The alarm on indicator (when any alarm is on) and the Hourly
Time Signal on indicator (when the Hourly Time Signal is on) are
shown on the digital display in all modes.
To stop the alarm
Press any button.
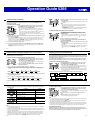
Alarm on indicator
Hourly time signal
on indicator
E-44
Using the Stopwatch
The stopwatch measures elapsed time and split times.
To enter the Stopwatch Mode
Use
C
to select the Stopwatch Mode (
STW
) as shown on page E-8.
•
STW
will appear on the digital display for about one second. Next,
the digital display will change to show the stopwatch time.
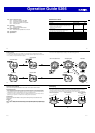
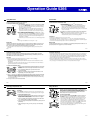
To perform an elapsed time operation
D
D D D B
Start Stop (Restart) (Stop) Reset
To pause at a split time
D
B B D B
Start Split Split release Stop Reset
• Digital display alternates between
SPL
and the 1/100-second value
at one-second intervals.
Note
• The Stopwatch Mode can indicate elapsed time up to 23 hours, 59
minutes, 59.99 seconds.
• Once started, stopwatch timing continues until you press
B
to reset
it, even if you exit the Stopwatch Mode to another mode and even if
timing reaches the stopwatch limit defi ned above.
• Exiting the Stopwatch Mode while a split time is frozen on the digital
display clears the split time and returns to elapsed time
measurement.
Hours
Minutes
1/100 second
Seconds
E-45
Using the Countdown Timer
The countdown timer can be confi gured to start at a preset time and sound an alarm when the end
of the countdown is reached.
To enter the Countdown Timer Mode
Use
C
to select the Countdown Timer Mode (
TIMER
) as shown on
page E-9.
•
TIMER
will appear on the digital display for about one second. Next,
the digital display will change to show the countdown time.
To specify the countdown start time
1. Enter the Countdown Timer Mode.
• If a countdown is in progress (indicated by the seconds
counting down), press
D
to stop it and then press
B
to reset to
the current countdown start time.
• If a countdown is paused, press
B
to reset to the current
countdown start time.
2. Hold down
A
until the minute setting of the current countdown start time starts to fl ash. This is
the setting screen.
3. Press
C
to move the fl ashing between the minute and second settings.
4. Use
D
(+) and
B
(–) to change the fl ashing item.
• To set the starting value of the countdown time to 100 minutes, set 00'00".
5. Press
A
to exit the setting screen.
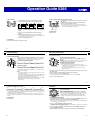
Countdown time
(Minutes, seconds)
E-46
To perform a countdown timer operation
D
D
D D
B
Start Stop (Restart) (Stop) Reset
• Before starting a countdown timer operation, check to make sure that a countdown operation is
not already in progress (indicated by the seconds counting down). If it is, press
D
to stop it and
then
B
to reset to the countdown start time.
• An alarm sounds for ten seconds when the end of the countdown is reached. This alarm will
sound in all modes. The countdown time is reset to its starting value automatically after the alarm
sounds.
To stop the alarm
Press any button.
E-47
Illumination
The display of the watch is illuminated for easy reading in the dark.
To turn on illumination
In any mode (except when a setting screen is on the digital display),
press
L
to illuminate the display.
• You can use the procedure below to select either 1.5 seconds or
three seconds as the illumination duration. When you press
L
, the
display will remain illuminated for about 1.5 seconds or three
seconds, depending on the current illumination duration setting.
To change the illumination duration
1. In the Timekeeping Mode, hold down
A
for at least two seconds until
ADJUST
appears on the
digital display. This is the setting mode. Release
A
after
ADJUST
appears.
• The name of the city currently selected as your Home City will appear on the digital display
with an arrow (
▲
) fl ashing to the left.
2. Press
C
10 times until
LIGHT 1
or
LIGHT 3
is displayed.
• See step 3 under “To change the current time and date settings” (page E-15) for information
about how to scroll through setting screens.
3. Press
D
to toggle the illumination duration between three seconds (
LIGHT 3
displayed) and
1.5 seconds (
LIGHT 1
displayed).
4. When the setting is the way you want, press
A
twice to return to the Timekeeping Mode.