


Operation Guide 5266
E-24
Important!
• To ensure correct direction readings by this watch, be sure to perform bidirectional calibration
before using it. The watch may produce incorrect direction readings if you do not perform
bidirectional calibration.
• Keep the watch away from audio speakers, magnetic necklace, cell phone, and other devices
that generate strong magnetism. Exposure to strong magnetism can magnetize the watch and
cause incorrect direction readings. If incorrect readings continue even after you perform
bidirectional calibration, it could mean that your watch has been magnetized. If this happens,
contact your original retailer or an authorized CASIO Service Center.
Precautions about bidirectional calibration
• You can use any two opposing directions for bidirectional calibration. You must, however, make
sure that they are 180 degrees opposite each other. Remember that if you perform the
procedure incorrectly, you will get wrong bearing sensor readings.
• Do not move the watch while calibration of either direction is in progress.
• You should perform bidirectional calibration in an environment that is the same as that where
you plan to be taking direction readings. If you plan to take direction readings in an open fi eld,
for example, calibrate in an open fi eld.
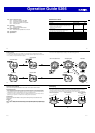
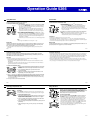
To perform bidirectional calibration
1. In the Qibla Mode, hold down
A
for two seconds.
• This will cause the bidirectional calibration screen to appear on
the digital display.
• The second hand will move to 12 o’clock. This causes an arrow
(
) symbol to fl ash on the left side of the digital display and -1-
to be displayed to indicate that the watch is ready for calibration
of the fi rst direction.
E-25
2. Place the watch on a level surface facing any direction you want,
and press
B
to calibrate the fi rst direction.
• - - - will remain on the digital display while calibration is in
progress. OK will appear when fi rst direction calibration is
complete. About one second after that, the fl ashing arrow will
change to point downwards (
) and -2- will be displayed. This
means that the watch is ready for calibration of the second
direction.
3. Rotate the watch 180 degrees.
4. Press
B
again to calibrate the second direction.
• - - - will remain on the digital display while calibration is in progress. OK will appear when
second direction calibration is complete.
• If ERR appears on the digital display, press
B
again to restart calibration.
•
Magnetic Declination Correction
With magnetic declination correction, you input a magnetic declination angle (difference between
magnetic north and true north), which allows the watch to indicate true north. You can perform this
procedure when the magnetic declination angle is indicated on the map you are using. Note that
you can input the declination angle in whole degree units only, so you may need to round off the
value specifi ed on the map. If your map indicates the declination angle as 7.4°, you should input
7°. In the case of 7.6° input 8°, for 7.5° you can input 7° or 8°.
E-26
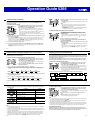
To perform magnetic declination correction
1. In the Qibla Mode, hold down
A
for two seconds.
• This will cause the bidirectional calibration screen to appear on
the digital display.
2. Press
C
to display the Qibla magnetic declination setting screen
(
Q.DEC
).
• Pressing
C
again will display the northerly magnetic declination
setting screen (N.DEC).
• This will cause the current magnetic declination angle setting to
fl ash on the digital display.
3. Use
D
(East) and
B
(West) to change the settings.
•
The following explains magnetic declination angle direction
settings.
OFF
: No magnetic declination correction performed. The default
setting for each city will be used for the Qibla magnetic
declination. The northerly magnetic declination setting
(
N.DEC
) will be 0°.
E
: When magnetic north is to the east (east declination)
W
: When magnetic north is to the west (west declination)
• You can select a value within the range of W 90° to E 90° with
these settings.
• You can turn off (OFF) magnetic declination correction by
pressing
D
and
B
at the same time.
• Pressing
D
and
B
at the same time will cause the Qibla
magnetic declination correction value (Q.DEC) to change to the
initial default setting of the currently selected Home City, and
the northerly magnetic declination setting (N.DEC) to change to
OFF (0˚).
Magnetic declination
angle direction value
(E, W, or OFF)
Magnetic declination
angle value
E-27
• The illustration, for example, shows the value you should input and the direction setting you
should select when the map shows a magnetic declination of 7° West.
4. When the setting is the way you want, press
A
to exit the setting screen.
Digital Compass Precautions
This watch features a built-in magnetic bearing sensor that detects terrestrial magnetism. This
means that north indicated by this watch is magnetic north, which is somewhat different from true
polar north. The magnetic north pole is located in northern Canada, while the magnetic south pole
is in southern Australia. Note that the difference between magnetic north and true north as
measured with all magnetic compasses tends to be greater as one gets closer to either of the
magnetic poles. You should also remember that some maps indicate true north (instead of
magnetic north), and so you should make allowances when using such maps with this watch.
Location
• Taking a direction reading when you are near a source of strong magnetism can cause large
errors in readings. Because of this, you should avoid taking direction readings while in the
vicinity of the following types of objects: permanent magnets (magnetic necklaces, etc.),
concentrations of metal (metal doors, lockers, etc.), high tension wires, aerial wires, household
appliances (TVs, personal computers, washing machines, freezers, etc.).
• Accurate direction readings are impossible while in a train, boat, air plane, etc.
• Accurate readings are also impossible indoors, especially inside ferroconcrete structures. This
is because the metal framework of such structures picks up magnetism from appliances, etc.
Storage
• The precision of the bearing sensor may deteriorate if the watch becomes magnetized. Because
of this, you should store the watch away from magnets or any other sources of strong
magnetism, including: permanent magnets (magnetic necklaces, etc.) and household
appliances (TVs, personal computers, washing machines, freezers, etc.).
• Whenever you suspect that the watch may have become magnetized, perform the procedure
under “To perform bidirectional calibration” (page E-24).
E-28
Viewing Prayer Names and Prayer Times
This watch is designed so its second hand points to prayer names on the face, and displays prayer
times. The Today’s Salat Time Screen shows prayer times and elapsed prayer time. The SALAT
time search mode can be used to view the prayer times for a specifi c date. A Prayer Time Alarm
(which can be switched on and off) sounds for 10 seconds when each prayer time arrives. Press
any button to stop the alarm after it starts to sound.
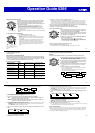
About prayer times
Prayer times are calculated automatically in accordance with the time, date, city data, and prayer
time calculation method you set in the Timekeeping Mode. This, of course, means that you should
always make sure that your Timekeeping Mode settings are confi gured correctly.
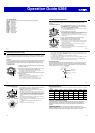
Prayer Indicator Prayer Time
FAJR Fajr start time
SUNRISE Sunrise time
ZUHR Zuhr start time
ASR Asr start time
MAGHRIB Maghrib start time
ISHA Isha start time
E-29
To display today’s prayer times
1. In the Timekeeping Mode, press
D
.
• This displays the Today’s Salat Time Screen.
• The second hand will move to the name of the next prayer
scheduled after the current time.
• The digital display will show the start time of the prayer indicated
by the second hand.
2. Use
A
to move the second hand sequentially to the other prayer
names. The digital display will show the start time of the prayer
indicated by the second hand.
SUNRISE
ZUHR
ASR MAGHRIB ISHA
FAJR
• If you do not press
A
for about one or two minutes after moving
the second hand, it will move back to the next scheduled prayer
automatically.
•
Pressing
D
returns to the next prayer time screen.
• Press
C
to return to the Timekeeping Mode.
Current alarm on
indicator (currently
display alarm on)
Prayer time alarm on
indicator (at least one
alarm on)