


Operation Guide 4782 (OC)
8
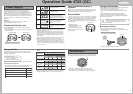
6. Use the
DD
DD
D (+) and
BB
BB
B (–) buttons to change the flashing
setting.
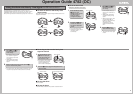
a. When the 12/24-hour timekeeping setting is selected
Press D to toggle the timekeeping
format between 12-hour (“12H”
indicator) and 24-hour (“24H”
indicator).
b. When the seconds setting is selected
Press D to reset the seconds to 00
in accordance with the time signal
on the radio, TV, etc.
• Pressing the D button while the
seconds count is in the range of
30 to 59 resets it to 00 and also
adds 1 to the minutes. Pressing
the D button in the range of 00
to 29 resets the seconds count
without changing the minutes.
c. When the hour, minutes, year, month, or day setting is
selected
Press the D button to increase the
selected setting or the B button to
decrease it.
• Holding either button scrolls the
setting at high speed.
d. When the language setting is selected
Press the D button to toggle
between Japanese (kanji) and
English.
e. When the Power Saving setting is selected
While the Power Saving setting is
selected, press the D button to
toggle it ON and OFF.
12/24-hour Timekeepin
g
Resets to 00.
Hour Minute
(–)
(+)
Japanese (Kan
j
i)
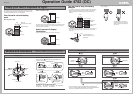
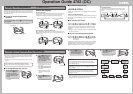
Configuring Analog Settings
You can use the Hand Setting Mode to adjust the analog time
manually when it does not match the digital time.
1. Hold down the
AA
AA
A button
for about two seconds.
• This will cause the second
hand to move to 12 o’clock
and stop.
• “-00-” will be flashing on the
digital display.
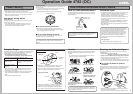
2. If the second hand does
not align properly with the
12 o’clock position, press
the
DD
DD
D button to adjust it.
• Each press of the D button
advances the second hand
one second.
• Holding down the D button
advances the hand at high
speed.
Hand Setting Mode
(+)
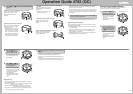
3. Press the
CC
CC
C button to
advance to setting of the
hour and minute hands.
• This causes the hour and
minute digits to flash on the
digital display.
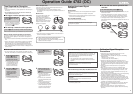
4. Use the
DD
DD
D (+) and
BB
BB
B (–)
buttons to adjust the hour
and minute hands.
• Each press of the D button
moves the hands 10 seconds
clockwise, while the B button
moves them 10 seconds
counterclockwise.
• Holding down either button
changes the setting at high
speed.
High-speed Lock
• You can use either of the following two operations to lock high-
speed hand movement.
Clockwise: Holding down the D button to start high-speed hand
movement, press B to lock it.
Counterclockwise: Holding down the B button to start high-
speed hand movement, press D to lock it.
• High-speed movement will continue until it completes a 12-hour
cycle, or until you press any button to stop it.
5. When the analog setting is the way you want, press the
AA
AA
A button.
• This exits the setting screen and synchronizes the minute
hand with the current seconds count automatically.
• At this time, the second hand will adjust automatically to the
digital time.
• The setting screen also will be exited automatically if you do
not perform any operation for about two or three minutes.
(–)
(+)
• When setting the hour, make sure you specify AM (no indicator) or
PM (P) correctly when using 12-hour timekeeping, or that you
specify the correct 24-hour time.
• You can set the year within the range of 2000 to 2099. The day of
the week is set automatically in accordance with the date you set.
• The watch makes adjustments for leap years and month lengths
automatically.
7. When the settings are the way you want, press the
AA
AA
A
button to exit the setting screen.
• The setting screen also will be exited automatically if you do
not perform any operation for about two or three minutes.
Digital-Analog Synchronization
After adjustment of the digital time, the watch will adjust its analog
setting automatically to match.
• When adjusting the analog time, the hands may move clockwise
or counterclockwise.
• Depending on how many hours different the digital and analog
time settings are, it may take some time for the analog hand
setting procedure to be finished.
• After adjustment of the hour and minute hand, the second hand
will adjust automatically to the digital time.