


Operation Guide 2891
15
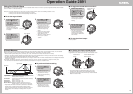
Altitude Reading Precautions
Readings that are close to the absolute altitude above sea level
are not possible under the following conditions.
• During volatile weather conditions
• During sudden temperature changes
• When the watch is being subjected to strong impact
❚
Altitude Terminology
There are two different methods that can be used to express
altitude.
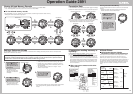
Altitude above Sea Level
This is an absolute measurement of altitude above sea level.
Relative Altitude
This expresses the difference in altitude between two locations
(altitude differential).
• Your watch measures relative altitude.
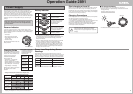
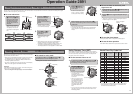
Absolute Altitude and Relative Altitude
Sea
Building Height:
130 meters
Relative Altitude
(Altitude
Differential)
Roof is 230
meters above
sea level.
Altitude above
Sea Level
Point A
Point B
400
❚
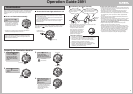
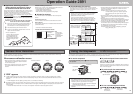
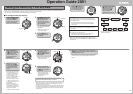
Altitude Reading Precautions
• Your watch converts barometric pressure readings into altitude
values. Because of this, changes in local barometric pressure can
cause different results for altitude readings taken in the same
location.
959hPa
500m
921hPa
835m
994hPa
200m
955hPa
535m
1,018hPa
0m
978hPa
335m
Building Height
200m
Sea Level
Barometric Pressure
(Seal Level)
12/28 12/31
1,030hPa
990hPa
(Ground Level)
100 meters above sea level
0m
100m
300m
600m
12/28 <Building Height> 12/31
12/28 <Ground Level> 12/31
Example: Even if you set zero for the reference altitude at
ground level, a difference in atmospheric pressure can
produce different altitude readings.
If you set a reference altitude of zero at ground level on
December 28 (fair, high barometric pressure of 1,030 hPa),
the same location will show an altitude of 335 meters on
December 31 (rain, low barometric pressure of 990 hPa).
• Height of a building and
mountain from ground
level (relative altitude)
12/28 and 12/31 displayed altitude
12/28 <Mountain Height> 12/31
Mountain
Peak
Height
500m
Altitude
above
Sea
Level
• Accurate readings are not possible when barometric pressure and
temperature are fluctuating widely due to sudden and severe
changes in the weather.
Example: When you approach a low pressure area while
mountain climbing, the drop in pressure produces
altitude readings that are higher than the actual
altitude.
• To avoid the effect of sudden temperature changes on readings,
wear the watch so it is in direct contact with your wrist while taking
readings.
• Remember that the air inside of a commercial aircraft is
pressurized. Because of this, the readings produced by this watch
will not match the altitude readings announced by the flight crew.
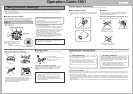
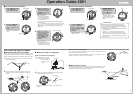
• This watch is designed to take altitude readings at preset
intervals. Never try to use it for altitude readings while engaged in
the following types of sports, during which altitude can change
very rapidly over a short time span.
Example: Skydiving, hang gliding, paragliding, gyrocopter
flying, glider flying, etc.
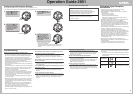
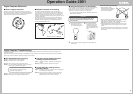
The watch disables the sensor operation and displays the indicator described below whenever a sensor malfunctions or when faulty
contact makes correct readings impossible.
When sensor malfunction occurs
• When a pressure sensor or direction sensor occurs,
“ERR” flashes on the display for about two seconds
and then readings stop.
• When sensor malfunction occurs, take your watch to
your nearest CASIO Service Center to have it
checked.
If “ERR” appears
1.
If “ERR” appears while you are taking a pressure, altitude, temperature, or direction reading, try taking the reading again. If “ERR”
appears again, it probably means that the sensor is malfunctioning. Take your watch to the nearest CASIO Service Center to have it
checked.
• If “ERR” disappears from the display right away, check, it could indicate the following.
2. Regardless of whether the current battery level is Level 2 or higher, the watch may determine that the current power level is not enough to
driver the sensor in the Compass, Pressure, or Altitude Mode. If this happens, “ERR” will appear on the display and the sensor will not
take the reading.
• This does not indicate malfunction. In this case, normal operation should return after battery power recovers.
Altitude DirectionBarometric Pressure
Sensor Error Detection
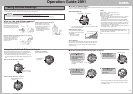
The stopwatch measures elapsed time in units of 1/100 second up to 9 hours, 59 minutes, 59.99 seconds (10 hours). When the maximum
limit is reached, the elapsed time returns to zero automatically and timing continues from there.
❚
To use the stopwatch
In the Stopwatch Mode, press the
CC
CC
C button to start and stop
the stopwatch.
1/100 second
Hour, Minute,
Second
Current Time
(Split/Reset)
(Start/Stop)
• Pressing the A button while an elapsed time operation is
being performed freezes the current time on the display and
continues timing of the next split internally. This condition is
indicated by the “SP” (split) indicator on the display.
• Changing to another mode while a split time is displayed
cancels the split time operation.
• Pressing the A button while timing is stopped resets the
stopwatch.
❚
To perform elapsed time measurement
Start Stop Reset
Cumulative Time Measurement
Pressing the C button to restart the stopwatch without resetting it
to all zeros causes the elapsed time measurement to resume from
where it was last stopped.
❚
To perform split time measurement
Record Split Release Split ResetStopStart
Split Time Screen
❚
To time 1st and 2nd place finishers
Start
1st Finisher
(Displays time
of 1st finisher.)
2nd Finisher Displays time
of 2nd finisher.
Reset
Using the Stopwatch
Use the
DD
DD
D button to enter the Stopwatch Mode as shown
under “Modes and Display Screens”.
❚
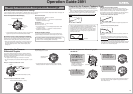
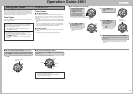
Application: Obtaining an altitude
reading with the watch that is close to
the absolute altitude above sea level
The best way to obtain an altitude reading with the watch (relative
altitude) that is close to the absolute altitude above sea level is to
set altitude values obtained from markers provided at the
seashore or along a mountain path as your reference altitude
value. This should be done immediately before using the watch to
take altitude readings.
• Note that daily fluctuations in atmospheric pressure affect altitude
readings, so you should set the reference altitude just before you
are ready to take readings.
Example: To set an indicated altitude of 400 meters
above sea level as the reference altitude
1. At Point A in the illustration, set the reference altitude to
400 meters, which is the absolute altitude above sea
level indicated on a marker provided along the trail.
2. Take altitude readings from Point A to Point B.
3. If there is another absolute altitude marker at Point B,
update the reference altitude.
• Be sure to update the
reference altitude at Point B if
the value displayed by the
watch is different from the
absolute altitude indicated by
the marker along the trail at
Point B.