


Operation Guide 2891
12
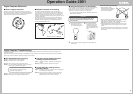
The watch uses International Standard Atmosphere (ISA) values that are defined by the International Civil Aviation Organization (ICAO) to
convert readings taken by its built-in pressure sensor to relative altitude values.
Important!
When taking altitude readings, make sure that the temperature of the watch is kept as stable as possible, and is not affected by changes
in temperature. You can do this by keeping the watch in direct contact with your skin.
• Variation in the watch’s temperature due to changes in air temperature or altitude can cause altitude reading error.
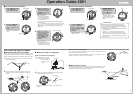
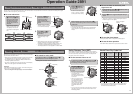
What can I do with altitude readings?
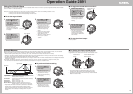
Example 1: Find out how high you have hiked or climbed.
Start an altitude reading operation at
the foot of the mountain as you start
off, and find out how many meters
you climbed when you get to the top.
Example 2: Determine how high above sea level your house is.
When you travel from your home to
the beach, you can measure the
relative change in altitude and
determine how high your home is
above sea level.
❚
To take an altitude reading
In the Timekeeping Mode, Compass Mode, or Pressure/Temperature Mode, press the C button to enter the Altitude Mode. The watch will
measure your current altitude and display it.
Altitude
Display Range: –10,000 to 10,000 meters
Display Unit: 5 meters
Measurement Range: –700 to 10,000 meters
Measurement Unit: 5 meters
• Though the display range covers 20,000 meters (from –10,000 to
10,000), the measurement range covers only 10,700 meters
(–700 to 10,000).
• The altitude values produced by the watch are relative altitude
values. This means they are relative to a reference altitude value
that you preset. Even when you are at a location that is above sea
level, the watch may display a negative value (indicating you are
currently lower than your reference value).
• The display shows “– – –” when the measured value is outside the
measurement range or display range.
If you do not perform any button operation for nine or ten
minutes while in the Altitude Mode, the watch will return to the
Timekeeping Mode automatically.
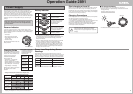
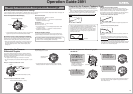
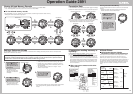
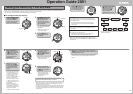
Altitude Mode Display
Altitude Graph ACT Indicator
Altitude
Current Time
• The altitude can take up to four or five seconds to appear after
you enter the Altitude Mode.
Altitude Tendency Graph
The altitude tendency graph shows
past altitude values measured in the
Altitude Mode.
• Each plot on the graph
represents 10 meters.
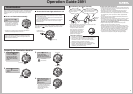
Altitude Readings
After you enter the Altitude Mode, the watch takes readings every
five seconds for three minutes (ACT indicator flashing). After that,
readings are taken every two minutes (ACT indicator displayed,
without flashing).
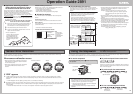
Taking Altitude Readings
Current altitude (flashing)
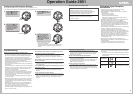
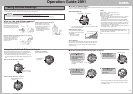
Interpreting the Altitude Differential Graphic
In excess of ±15 meters
Graphic displayed at 9 o’clock
Indicator appears
at 9 o’clock
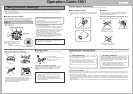
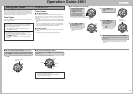
❚
To turn the altitude differential graphic on and off
3. Press the
CC
CC
C button to
toggle the setting on
(display graphic) and off
(do not display graphic).
4. Press the
EE
EE
E button to exit
the setting screen and
return to the Altitude
Mode screen.
• The watch automatically exits the altitude differential graphic on/
off setting screen if you do not perform any operation for about
two or three minutes.
(2 seconds)
(Twice)
Reference altitude
Example 3: Measure how tall a building is.
Set the altitude to zero on the first
floor of a building, and then go up to
the top floor to measure how tall it is.
• Note that pressurizing and
ventilation equipment inside of
some buildings can cause errors
in altitude readings.
The altitude differential graphic shows the relative difference
between consecutive values measured in the Altitude Mode, so
you can monitor changes as you ascend or descend.
• The graphic shows changes up to
±15 meters in 5-meter units.
• You can turn display of the altitude differential graphic off, if you
want.
Example 1: Altitude Differential: –10 meters
+15m
–15m
±0m
Altitude Differential
Graphic (–10 meters)
Example 2: Altitude Differential: +15 meters
Altitude Differential Graphic
(+15 meters)
1. In the Altitude Mode, hold
down the
EE
EE
E button for
about two seconds until
“SET” appears at the top
of the display.
• After about four or five
seconds, the altitude value
will appear in the middle of
the display.
2. Press the
DD
DD
D button twice
to move the flashing to the
altitude differential
graphic O
n/OFF setting.