USER’S GUIDE 2496
2
Data Bank
The Data Bank Mode lets you store up to 60
records, each containing a name, telephone
number, e-mail address, and date of birth.
Records are automatically sorted based on the
characters of the name. You can recall records by
scrolling through them on the display.
• Instead of an e-mail address, you can use Data
Bank Mode memory to store addresses, mobile
phone numbers, URLs, etc.
• See “Sort Table” for details on how the
watch sorts records.
• All of the operations in this section are
performed in the Data Bank Mode, which you
enter by pressing C.
• See “Data Communication” for information
about exchanging Data Bank records.
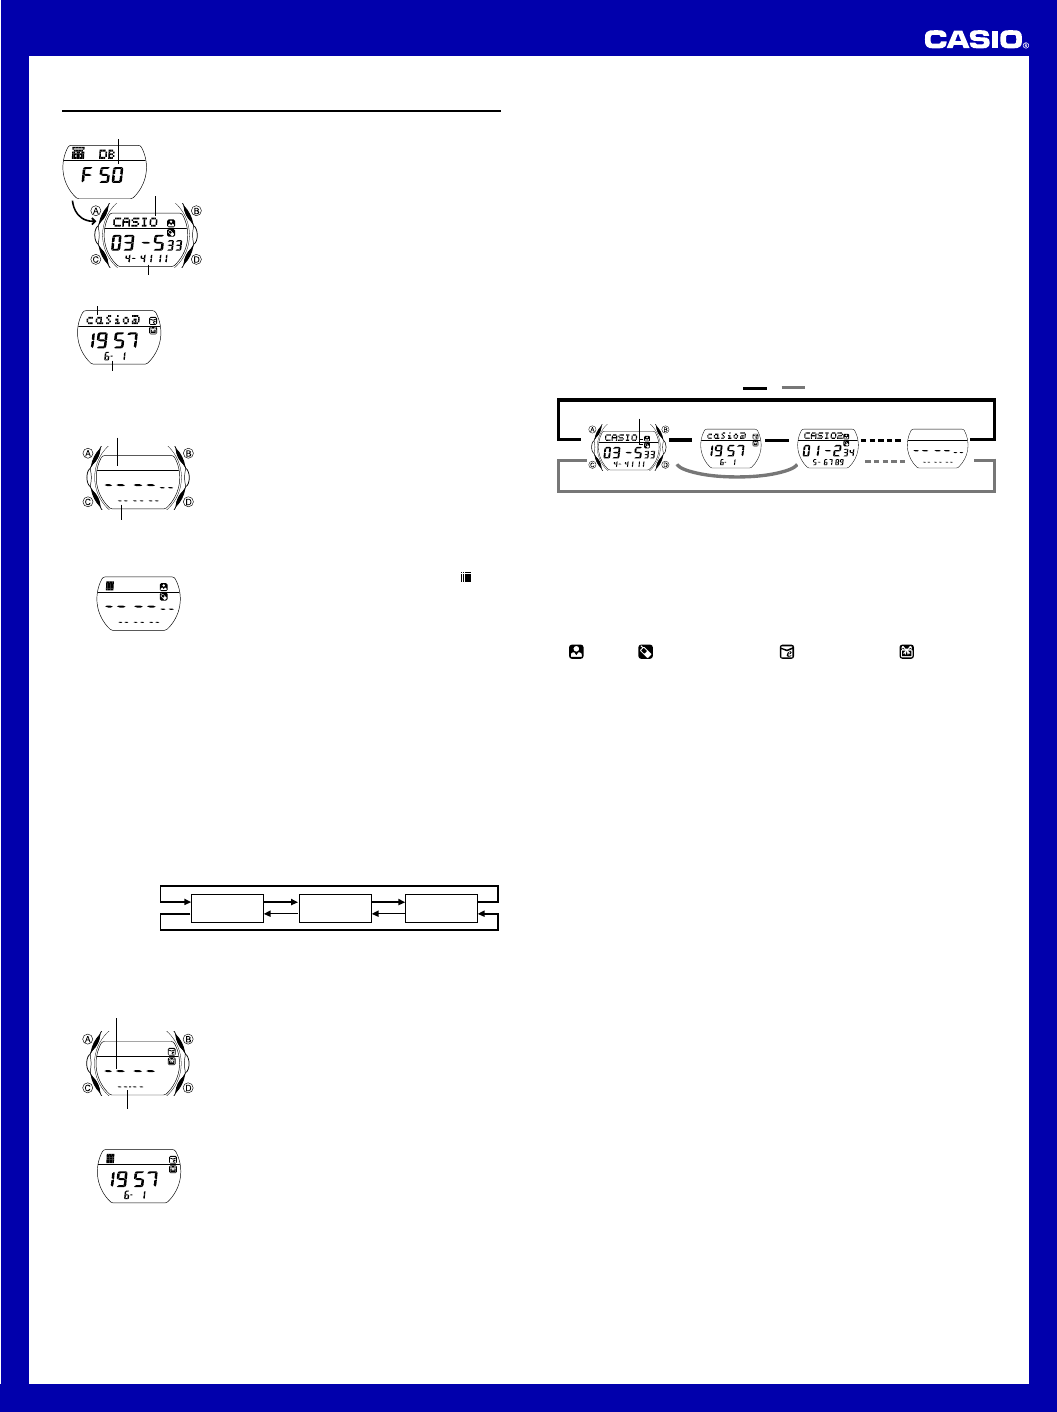
Remaining memory
Telephone number
e-mail address
Date of birth
Name
To create a new Data Bank record
1. In the Data Bank Mode, use B and D to
cycle through the record screens until the new
data screen appears.
• The new data screen is the one that is blank
(contains no name and telephone number).
• If the message
FULL appears on the
display, it means that memory is full. To
store another record, you will first have to
delete some of the records stored in
memory.
2. Hold down A until the flashing cursor (
)
appears in the text area of the display.
• Steps 3 through 9 describe how to input a
name, telephone number, e-mail address,
and date of birth into the record. If you want
to exit the setting screen and store the data
you have input up to any point during steps
3 through 9, press A twice.
l
l
l
l
l
l
l
l
l
l
Text area
Number area
New Data Screen
3. Input the name.
• You can input up to eight characters for the name.
• Use D (+) and B (–) to cycle through characters at the cursor position,
and then press C to move the cursor to the right. See “Inputting Text” for
more information.
• Pressing C while the cursor is located at the eighth character moves
the cursor to the first digit of the number area.
4. After you input the name, press C as many times as necessary to move
the cursor to the number area (if it is not already there).
5. Input the telephone number.
• Use D (+) and B (–) to cycle through numbers at the cursor position in
the sequence shown below, and then press C to move the cursor to the
right.
• You can input up to 12 digits for the telephone number. Pressing C
while the cursor is located at the 12th digit displays the date of birth
input screen.
Press D.
Press B.
x 0 to 9 (space)
6. After inputting the phone number, press C as
many times as necessary to display the date
of birth input screen.
7. Input the date of birth.
• Use D (+) and B (–) to change the setting
at the current cursor position, and then
press C to move the cursor to the right.
• Input four digits (2 + 2) for the year.
8. While the cursor is located at the day setting
of the date of birth, press C to move the
cursor to the text area.
9. Input the e-mail address.
• You can input up to 32 characters for the
e-mail address.
I
I
I
I
I
I
I
I
I
I
I
I
I
l
l
l
l
l
l
l
l
l
l
Year
Date (Month – Day)
• Use D (+) and B (–) to cycle through characters at the cursor position,
and then press C to move the cursor to the right. See “Inputting Text” for
more information.
10. After the e-mail address is the way you want, press A to store the
record.
• When you press A to store data, the message
SORT
appears on the
display for a while, indicating that data is being sorted. After the sort
operation is complete, the cursor appears in the text area, ready for
input of a new Data Bank record.
• Depending on how many records you have in memory, the sort
operation can take up to 20 seconds.
11. Input more data (starting from step 3) or press A again to return to the
Data Bank record name and telephone number screen (without the
cursor).
• The name can show six characters at a time, so longer text scrolls
continuously from right to left. The last character is indicated by the symbol
H after it.
To recall Data Bank records
In the Data Bank Mode, use D (+) and B (–) to scroll through Data Bank
record screens on the display.
• Each Data Bank record has a Name/Telephone Number screen, and an
E-mail Address/Date of Birth screen. The Name/Telephone Number screen
always appears first.
▲
▲
▲
▲
▲
▲
Data type icons
Press D. Press B.
▲
▲
Name/Telephone
Number Screen
E-mail Address/
Date of Birth Screen
New Data
Screen
▲
• Note that the E-mail Address/Date of Birth screen does not appear if it does
not contain at least e-mail address or date of birth data. In this case,
pressing D scrolls to the next Data Bank record.
• A data type icon indicates the type of data that is displayed to the left of it:
(Name), (Telephone number), (e-mail address), (date of birth)
• Pressing B returns to the previous record’s Name/Telephone Number
screen, not the previous record’s E-mail Address/Date of Birth screen.
• The e-mail address can show six characters at a time. Longer text is
displayed by alternating 6-character blocks at regular intervals. The last
character of the address is indicated by the symbol H after it.
• Pressing D while the last Data Bank record (Name/Telephone Number
screen or E-mail Address/Date of Birth screen) is on the display or B while
the first record (Name/Telephone Number screen) is on the display displays
the new data screen.
To edit a Data Bank record
1. In the Data Bank Mode, use D (+) and B (–) to scroll through the record
screens and display the one you want to edit.
2. Hold down A until the flashing cursor appears on the display.
3. Use C to move the cursor to the character or digits you want to change.
4. Use D (+) and B (–) to change the character.
5. After making the changes that you want, press A to store the record.
•
SORT
appears on the display indicating that data is being sorted. After
that, the record’s Name/Telephone Number screen appears.
To delete a Data Bank record
1. In the Data Bank Mode, use D (+) and B (–) to scroll through the record
screens and display the one you want to delete.
• Note that performing the next two steps deletes the entire record,
regardless of whether you start from the Name/Telephone Number
screen or the E-mail Address/Date of Birth screen. You cannot delete
only Name/Telephone Number screen or E-mail Address/Date of Birth
screen data.
2. Hold down A until the flashing cursor appears on the display.
3. Press D and B at the same time to delete the record.
• The message
CLEAR
appears to indicate that the record is being
deleted. After the record is deleted, the cursor appears on the display,
ready for input.
4. Input data or press A to return to the new data screen.
• Pressing A causes the
SORT
to appear on the display indicating that
data is being sorted. After that, the new data screen appears.


